
Appearance
Azure Public Installation Instructions
Prerequisites
On Azure, you need a resource group and the ability to manage IAM access for it, as you must have the permissions to create and assign roles within that resource group.
It is recommended to use a dedicated resource group to isolate resources and simplify access management, such as by having owner permissions for that resource group.
You can use the Azure Portal to launch the interactive Deployer. However you must also be logged in to the Azure CLI in order to create the template spec as outlined below. Also, you'll need to make sure you can access the network the deployer is running in from a web browser.
Quota
The following minimum Compute quota limits are required to successfully run the Deployer.
| Quota name | Value |
|---|---|
| Standard DDSv5 Family vCPUs | 16 |
| Standard Dv5 Family vCPUs | 16 |
| Standard LSv3 Family vCPUs | 32 |
| Total Regional vCPUs | 60 |
Azure Government
Yellowbrick can be installed into Azure Government regions. It is the same product and the same installation procedure as global Azure; this section covers only the differences. Where a topic is documented elsewhere, the Government notes live with that topic and are linked from here.
Portal, CLI, and region
The Government portal is at https://portal.azure.us. Point the Azure CLI at the Government cloud before you sign in or deploy:
bash
% az cloud set --name AzureUSGovernment
% az login
usgovvirginia is a qualified installer region; see Supported Cloud Regions.
Selecting the Government cloud
The Deployer resolves which Azure cloud to use from the AZURE_ENVIRONMENT environment variable in the environment it runs in:
AZURE_ENVIRONMENT | Cloud |
|---|---|
unset, AzurePublicCloud, or AzureCloud | Global Azure |
AzureUSGovernment or AzureUSGovernmentCloud | Azure Government |
Any other value is rejected with an error rather than ignored, so a Government deployment cannot silently fall back to global Azure endpoints. In Government, this setting also selects the Government service suffixes: blob.core.usgovcloudapi.net for Blob storage and .azurecr.us for the container registry.
The Deployer template sets AZURE_ENVIRONMENT for you, from its azureEnvironment parameter. Set it to AzureUSGovernment for a Government installation:
- In the portal, set the
azureEnvironmentfield on the custom deployment form. - With the Azure CLI, add
--parameters azureEnvironment=AzureUSGovernmentto theaz stack group createcommand.
Left empty, which is the default, the parameter resolves to the cloud the deployment itself runs in. A deployment made through https://portal.azure.us or an Azure CLI set to AzureUSGovernment therefore reaches the Government endpoints even if you do not set the parameter. Set it anyway when you want the cloud recorded in the deployment artifact rather than inferred.
AzureUSGovernmentCloud is accepted as well. There is no value for global Azure: an empty parameter already means global Azure, and offering one would let a Government deployment be pinned to commercial endpoints. Any other value is rejected by Azure Resource Manager before the Deployer virtual machine is created, so a Government deployment cannot be misspelled into a commercial one. The Deployer records the cloud it resolved in /var/log/bootstrap.log on the Deployer virtual machine.
Deployer virtual machine size
The Deployer template exposes a vmSize parameter, which defaults to Standard_D4ds_v5. That default is offered in both global Azure and Government regions. Whichever size you use must support Premium storage and accelerated networking and must be available in zone 1 of the region you deploy into. A subscription may still lack quota or capacity for a given size in a given region, so confirm before you deploy and override the parameter if you need to:
- In the portal, set the
vmSizefield on the custom deployment form. - With the Azure CLI, add
--parameters vmSize=<size>to theaz stack group createcommand.
Obtaining the Deployer image and template
The Deployer image and the installation template are distributed separately in Azure Government, because neither artifact crosses the boundary between global Azure and Government.
NOTE
The Launch on Azure button and the https://ybinstallerprod.blob.core.windows.net/... template URI shown elsewhere on this page are global Azure artifacts and do not work in Government.
Deployer image. An Azure Compute Gallery does not replicate across the commercial/Government boundary, so the Government Deployer image is built and published natively in Government, in a Yellowbrick-owned gallery in usgovvirginia. Yellowbrick shares the image version with your subscription; contact Yellowbrick Support for the image version to use with your release.
Installation template. The template is hosted in a Yellowbrick-owned Government storage account, under the Government blob suffix rather than the global one:
https://<storage-account>.blob.core.usgovcloudapi.net/<version>/mainTemplate.jsonContact Yellowbrick Support for the storage account and version for your release. Deploy it from the Government portal at https://portal.azure.us, or with the Azure CLI as described in Deploying via Azure Command Line Interface, substituting this template URI for the global one.
If your policy forbids reading public blobs
The template is served from a container with public blob access so that Azure can read it by URI. If your policy does not allow retrieving it that way, ask Yellowbrick Support for the template file and deploy it as a custom template instead:
- Save the template file locally.
- Visit Azure Portal Custom Deployment.
- Choose Build your own template in the editor.
- Load the template file, then press Save.
The custom deployment then prompts for the same parameters as a deployment by URI. The Deployer image itself is shared with your subscription through the gallery and is not affected by this restriction.
Container images
A Government installation does not need egress to a Yellowbrick image registry. All product images ship on the Deployer virtual machine, under /opt/ybd/image, and are pushed into your own Azure Container Registry during installation.
Network egress
Government installations reach a different set of Azure endpoints. The endpoints to allow through your firewall are documented with the egress rules for private installations; see Azure Private Installation Instructions.
DNS
Yellowbrick does not create or manage public DNS records on Azure in either cloud, so you manage Government DNS records yourself, exactly as in global Azure. See Vanity DNS and Configuring DNS Records for Azure.
Customer-managed encryption keys
Two independent customer-managed key options apply to an installation, on two different resources. They are not interchangeable:
- Block storage (managed disks) is encrypted with an Azure Disk Encryption Set that you supply at install time. It can only be set when the instance is created. See Deployer Web UI Notes.
- Object storage (the storage account) is created with Microsoft-managed keys. You can switch it to a customer-managed key after installation, as described below.
Switching the storage account to a customer-managed key
The Deployer creates the storage account with every service encrypted using Microsoft-managed keys. When it reconciles an existing installation, it confirms that the storage account is one it created and otherwise leaves the account untouched — it does not modify the account's encryption settings after creation. You can therefore switch the account to a customer-managed key yourself once installation is complete, and the setting persists.
In outline, you create a key vault and key in your Government subscription, grant the storage account's identity access to that key, and then change the account's encryption key source from Microsoft-managed to customer-managed. Follow Microsoft's documentation for the current steps: Customer-managed keys for Azure Storage encryption.
NOTE
If the key is deleted, or the storage account's access to it is revoked, the data encrypted with it may be unrecoverable. Use this option only if you have established key rotation and retention practices.
Authentication
- Yellowbrick Manager single sign-on against Government Entra ID is configured the same way as in global Azure. See Single Sign-On.
- Database external authentication uses a Government issuer. See CREATE EXTERNAL AUTHENTICATION.
Loading data
To authenticate implicitly with a managed identity against Government Blob storage or Azure Data Lake Storage Gen2, set the authorityHost provider property. See Azure Authentication Methods.
Hardware selection
Azure installations can override the shipped virtual machine sizes in the install config. Every hardware value must be an Azure SKU beginning with Standard_. Omitted fields retain the defaults shown below. An override cannot set a field to its zero value, such as compilerCpuCount: 0 or instanceSingleNode: false.
The instance.instanceConfiguration map accepts only the standard and scaled keys. Each entry overlays one shipped shared-services tier.
| Field | Standard default | Scaled default | Description |
|---|---|---|---|
bulkHardwareType | Standard_D8_v5 | Standard_D32_v5 | Azure VM SKU for bulk service nodes |
bulkNodeType | yb-bulksvc | yb-bulksvc-scaled | Node type for bulk service nodes |
compilerCpuCount | 4 | 30 | CPU count assigned to the compiler |
compilerHardwareType | Standard_L16s_v3 | Standard_D32_v5 | Azure VM SKU for compiler nodes |
compilerNodeType | yb-mgr | yb-compiler-scaled | Node type for compiler nodes; in the standard tier this must equal instanceNodeType |
instanceHardwareType | Standard_L16s_v3 | Standard_L48s_v3 | Azure VM SKU for instance nodes |
instanceNodeType | yb-mgr | yb-mgr-scaled | Node type for instance nodes |
limeMemory | 52Gi | 164Gi | LIME memory setting |
pgMemory | 52Gi | 164Gi | PostgreSQL memory setting |
rowstorePvcStorageClassName | premium | premium | Storage class for rowstore volumes |
rowstorePvcStorageSize | 200Gi | 200Gi | Size of rowstore volumes |
ybdataPvcStorageClassName | premium | premium | Storage class for data volumes |
ybdataPvcStorageSize | 200Gi | 200Gi | Size of data volumes |
The limeMemory and pgMemory values go directly into the LIME and PostgreSQL memory settings. Recalculate both when selecting a VM size with a different amount of RAM.
The instance.computeClusterConfiguration map accepts only small-v1 and large-v1. Azure applies hardwareType, vcpu, memoryBytes, and storageBytes together when hardwareType differs from the shipped SKU. All four fields are required in that case. Restating the shipped SKU, or omitting hardwareType, keeps the shipped compute node definition.
| Field | Applied on Azure | Description |
|---|---|---|
hardwareType | Yes | Azure VM SKU for the compute node group; changing the shipped SKU also requires vcpu, memoryBytes, and storageBytes |
vcpu | Yes | Compute node logical CPU count |
useHyperThreads | Yes | Whether the compute node uses hyperthreading |
k8sReservedVcpu | Yes | Kubernetes CPU allowance; defaults to 1 on Azure, and must be less than vcpu |
memoryBytes | Yes | Memory available to the compute node |
storageBytes | Yes | Per-node local NVMe storage budget |
ignoreAttachedNvme | Yes | Must not be true on Azure because Azure local NVMe devices are attached but unmounted |
The compute node discovers its NUMA and NVMe topology at boot, so a config-defined SKU needs no hand-written topology. The SKU must have local NVMe storage.
A config-defined SKU replaces the shipped hardware definition of the same name rather than adding a second one, so the resource keeps its shipped name while describing the configured SKU.
The kubernetes.azure block controls the AKS pools that do not derive their size from a shared services or compute node configuration.
| Field | Default | Description |
|---|---|---|
systemNodePoolHardwareType | Standard_D4ds_v5 | Azure VM SKU for the AKS system pool |
operatorNodePoolHardwareType | Standard_D4ds_v5 | Azure VM SKU for the operator and Yellowbrick Manager pool |
monitoringHardwareType.standard | Standard_D8_v5 | Azure VM SKU for standard monitoring |
monitoringHardwareType.scaled | Standard_D32_v5 | Azure VM SKU for scaled monitoring |
Government regions have a different SKU catalog, and Azure enforces quotas per VM family. This quota-safe example uses Standard_D4as_v6 only for the AKS system and operator pools so it can be provisioned as written.
json
{
  "instance": {
    "instanceConfiguration": {
      "standard": {
        "instanceHardwareType": "Standard_L16as_v4",
        "compilerHardwareType": "Standard_L16as_v4",
        "bulkHardwareType": "Standard_L8as_v4"
      },
      "scaled": {
        "instanceHardwareType": "Standard_L16as_v4",
        "compilerHardwareType": "Standard_L16as_v4",
        "bulkHardwareType": "Standard_L8as_v4"
      }
    },
    "computeClusterConfiguration": {
      "small-v1": {
        "hardwareType": "Standard_L16as_v4",
        "vcpu": 16,
        "useHyperThreads": true,
        "memoryBytes": 115964116992,
        "storageBytes": 3839700762624
      },
      "large-v1": {
        "hardwareType": "Standard_L16as_v4",
        "vcpu": 16,
        "useHyperThreads": true,
        "memoryBytes": 115964116992,
        "storageBytes": 3839700762624
      }
    }
  },
  "kubernetes": {
    "azure": {
      "systemNodePoolHardwareType": "Standard_D4as_v6",
      "operatorNodePoolHardwareType": "Standard_D4as_v6",
      "monitoringHardwareType": {
        "standard": "Standard_L8as_v4",
        "scaled": "Standard_L8as_v4"
      }
    }
  }
}
Launching the Deployer
NOTE
By installing Yellowbrick Enterprise Edition software into your Cloud Account, you agree to Yellowbrick’s Enterprise Edition EULA.
The Azure Deployer is based on Azure Resource Manager.
One-Click Deploy on Azure
Click the button below to launch Yellowbrick Deployer via the Azure portal.
Launch on AzureDeployer Interactive Installer
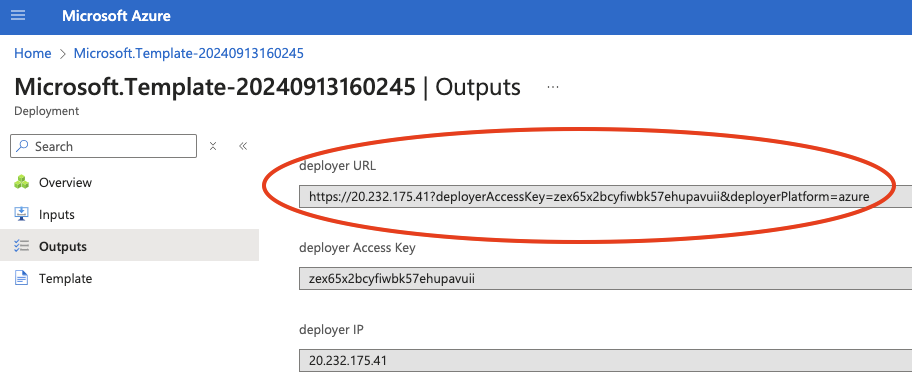
Once the deployment is completed, you will find the URL of the interactive Deployer in the output panel:
Deploying via Azure Command Line Interface (az cli)
You can launch the deployer in your azure subscription using the az command line interface. Locate a public key you will use for ssh access, and launch the command below:
bash
% az stack group create \                                                                                                                                                         :(
  --resource-group <resource group name> \
  --template-uri https://ybinstallerprod.blob.core.windows.net/7-4-5-83598-886cd9fd/deployment.json
When prompted, provide your ssh public key. The public key must begin with the string ssh-rsa or ssh-ed25519. You may also pass your public key as an extra parameter this way:
bash
% az stack group create \                                                                                                                                                         :(
  --resource-group <resource group name> \
  --template-uri https://ybinstallerprod.blob.core.windows.net/7-4-5-83598-886cd9fd/deployment.json \
  --parameters sshPublicKey='ssh-rsa ....<your-public-key>'
When the deployment is finished, a JSON document is presented which will contain outputs you will use to launch the deployer user interface or connect to the ip address via ssh.
The outputs will contain a fragment which looks like this:
json
    "outputs": {
      "deployer": {
        "type": "String",
        "value": "https://20.1.152.227?deployerAccessKey=xu7zkdfz5k5qazbfizu4l2g3po&deployerPlatform=azure"
      },
      "deployer Access Key": {
        "type": "String",
        "value": "xu7zkdfz5k5qazbfizu4l2g3po"
      },
      "deployer IP": {
        "type": "String",
        "value": "20.1.152.227"
      },
      "vm Name": {
        "type": "String",
        "value": "yb-deployer-ycxydoqcmo3ji"
      }
    },
You may launch the deployer web user interface with the url given for deployer, or connect via ssh with the deployer IP with user azureuser:
bash
% ssh azureuser@20.1.152.227

azureuser@yb-deployer-ycxydoqcmo3ji:~$ ls -l /opt/ybd/
total 276152
-rwxr-xr-x 1 root       root             538 May  9 12:12 bootstrap.sh
-rw-r--r-- 1 yb-install yb-install       224 May  8 23:31 environment
-rwxr-xr-x 1 yb-install yb-install       127 May  8 23:31 get-access-key
drwxr-xr-x 2 yb-install yb-install      4096 May  8 23:31 helm-charts
drwxr-xr-x 4 yb-install yb-install      4096 May  8 23:29 image
-rwxr-xr-x 1 yb-install yb-install 282751272 May  8 23:29 yb-install
Deploying via an Azure Portal
The deployer template can be downloaded here: Deployer Template
To use this template in the Azure Portal:
- Download the template
- Visit Azure Portal Custom Deployment
- Choose the option "Build your own template in the editor"
- Load the deployer template you downloaded to your local machine, and press Save
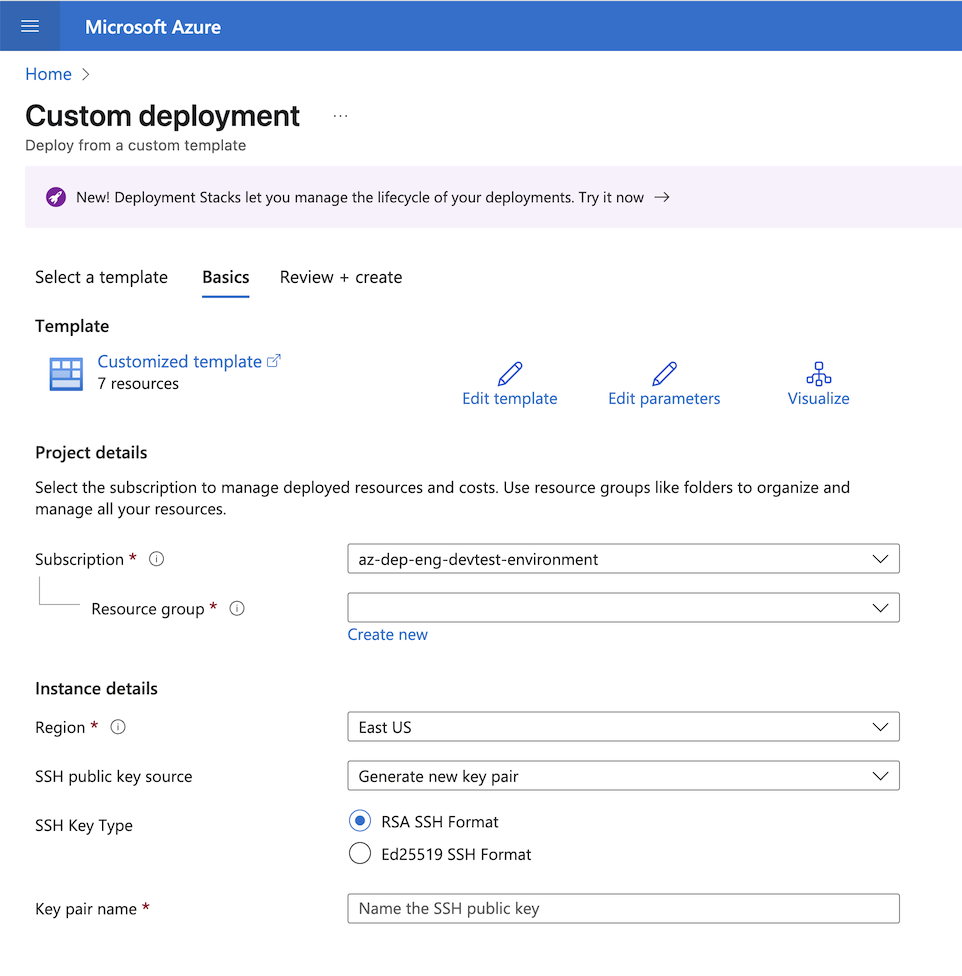
The custom deployment will appear with instructions to choose or create an ssh public key used to launch the deployer.
Cleanup
To remove the Deployer, navigate to the Azure Deployment Stacks service in the Azure portal under the resource group you used to create the Deployer. Select the deployment stack you created and named to install the Deployer and delete the deployment stack. For the "Managed Resources" options shown, choose the option to "Delete resources" vs. "Detach resources", which will remove the Azure VM instance and associated resources for the Deployer.