Appearance
AWS Public Installation Instructions
Prerequisites
Running the Deployer on AWS requires permission to create a virtual network, a security group, an EC2 instance and custom IAM roles. Although not mandatory, it is highly recommended to use a dedicated AWS account to simplify permission setup and ensure resource isolation.
The Deployer can be launched into the default VPC (if present) or one of your choice. You'll need to be able to reach the VPC from a web browser to use the Deployer, for example by providing an internet gateway. If you want to use a default VPC and it's been deleted, it can be recreated by running the following command:
bash
% aws ec2 create-default-vpcIt is possible to run the interactive Deployer directly from the AWS Management Console. If you want to use the command line interface, you will need to be logged in with the AWS CLI.
Quota
The following minimum quota limits are required to successfully run the Deployer.
| Quota name | Value |
|---|---|
| Running On-Demand Standard (A, C, D, H, I, M, R, T, Z) instances | 46 |
Launching the Deployer
NOTE
By installing Yellowbrick Enterprise Edition software into your Cloud Account, you agree to Yellowbrick’s Enterprise Edition EULA.
The Deployer is launched via an AWS CloudFormation template.
One-Click Deploy on AWS
Click the button below to launch Yellowbrick Deployer via the AWS console.
Deploying via an AWS CloudFormation Template
The URL of the template is different for commercial vs. government cloud regions:
- Commercial Cloud:
https://yb-installer-prod.s3.amazonaws.com/deploy/7.3.0-74895.181ea900/deploy-enterprise.json - Government Cloud:
https://yb-installer-prod.s3.us-gov-west-1.amazonaws.com/deploy/7.3.0-74895.181ea900/deploy-enterprise.json
You must create a new stack based on the published Deployer template:
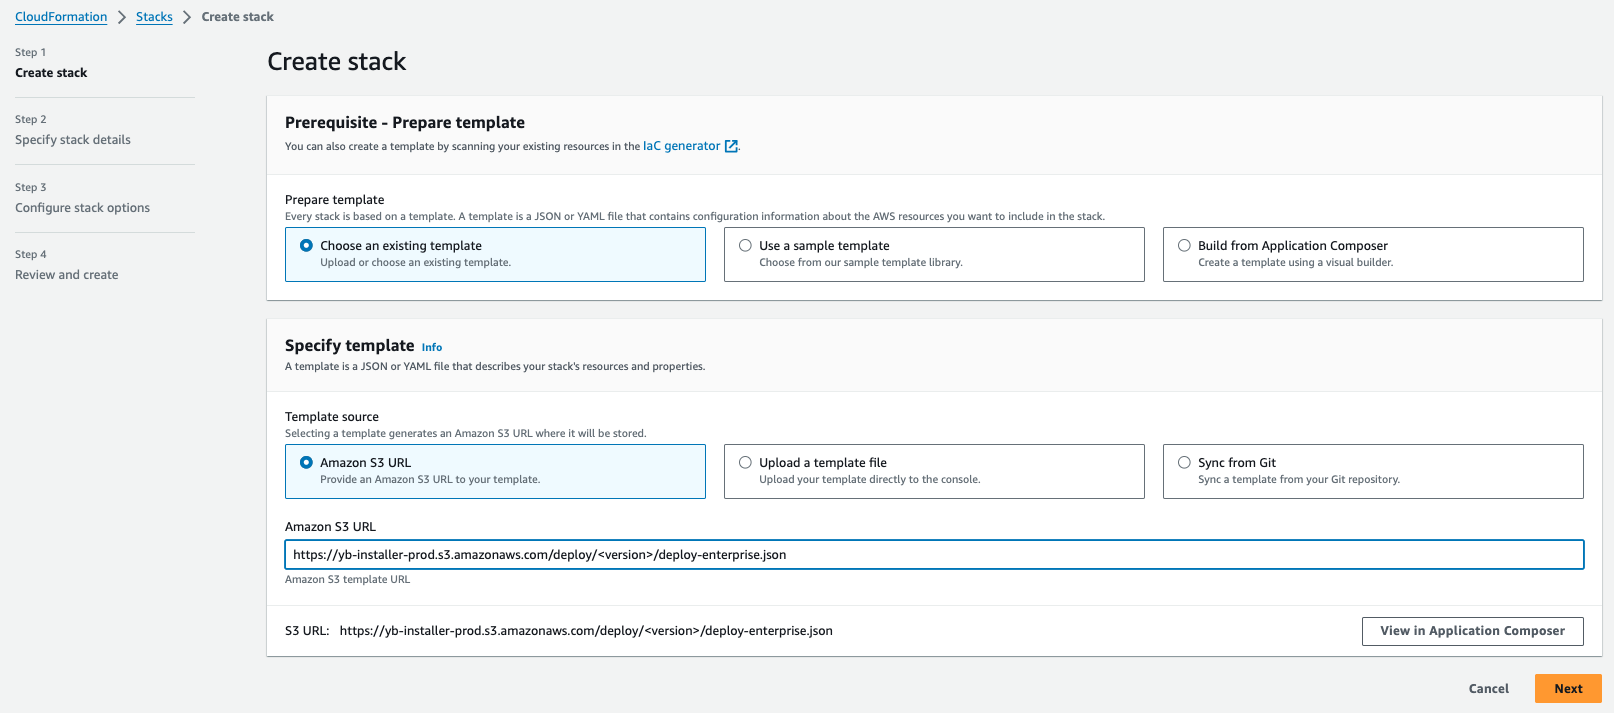
Fill out the different parameters and follow the UI until you trigger the stack creation, then wait until it finishes. You will find the URL of the interactive Deployer in the output tab:

The SSH keypair for the EC2 instance will be randomly generated. If access to the instance is needed, the private key can be found in AWS Systems Manager Parameter Store under the value yellowbrick-deployment-keypair.
Deploying via AWS Command Line Interface with CloudFormation Template
You can launch the deployer in your aws account using the aws command line interface. Use the commands below to launch the stack yb-deployer and wait for its completion.
bash
% aws cloudformation create-stack \
  --stack-name yb-deployer \
  --template-url https://yb-installer-prod.s3.amazonaws.com/deploy/7.3.0-74895.181ea900/deploy-enterprise.json \
  --capabilities CAPABILITY_NAMED_IAM \
  --parameters ParameterKey=AccessCIDR,ParameterValue=<access-cidr> ParameterKey=VPC,ParameterValue=<vpc-id> ParameterKey=Subnet,ParameterValue=<subnet-id>
% aws cloudformation wait stack-create-complete --stack-name yb-deployer
Replace the values for VPC and Subnet accordingly.
After launching the deployer, the output values can be displayed with this command:
bash
% aws cloudformation describe-stacks --stack-name yb-deployer --query "Stacks[0].Outputs"The output will look similar to the following:
json
[
    {
        "OutputKey": "DeployerURL",
        "OutputValue": "https://52.45.231.38?deployerAccessKey=i-0dfd83899be89af72&deployerPlatform=aws",
        "Description": "URL location for the Yellowbrick Deployer"
    },
    {
        "OutputKey": "DeployerIP",
        "OutputValue": "52.45.231.38",
        "Description": "Public IP address of the Yellowbrick Deployer"
    },
    {
        "OutputKey": "DeployerAccessKey",
        "OutputValue": "i-0dfd83899be89af72",
        "Description": "The access key for the Yellowbrick Deployer"
    }
]
You may launch the deployer web user interface with the url given for deployer, or connect via ssh with the deployerIP with user ubuntu:
bash
% ssh ubuntu@52.45.231.38

ubuntu@i-0dfd83899be89af72:~$ ls -l /opt/ybd/
total 276152
-rwxr-xr-x 1 root       root             538 May  9 12:12 bootstrap.sh
-rw-r--r-- 1 yb-install yb-install       224 May  8 23:31 environment
-rwxr-xr-x 1 yb-install yb-install       127 May  8 23:31 get-access-key
drwxr-xr-x 2 yb-install yb-install      4096 May  8 23:31 helm-charts
drwxr-xr-x 4 yb-install yb-install      4096 May  8 23:29 image
-rwxr-xr-x 1 yb-install yb-install 282751272 May  8 23:29 yb-install
Cleanup
To remove the Deployer, navigate to the CloudFormation service in the AWS Management Console, and select the Stack used to install the Deployer. Delete the Stack in the console. This will remove the EC2 instance and associated resources.