Appearance
VPC Peering Step-By-Step Tutorial
This tutorial will create the example hub and spoke architecture shown below in AWS. It will:
- Create a spoke VPC with the Yellowbrick Deployer installed in a public subnet and the Yellowbrick Database installed in the private subnet
- Create a Hub VPC where you will have a Windows Jumpbox in a public subnet. From here, you'll be able to access the Yellowbrick Manager
- Create a private subnet within the Hub VPC where you can have your data application (Tableau, Microstrategy, etc) and ETL tools (YBTools)
The architecture below is what you will have after following the step-by-step tutorial.

Prerequisites
Running the Deployer on AWS requires permission to create a virtual network, a security group, an EC2 instance and custom IAM roles. Although not mandatory, it is highly recommended to use a dedicated AWS account to simplify permission setup and ensure resource isolation.
Create the VPCs
1) Create the Hub VPC
- Go to VPC in AWS, click "Create VPC". Set the following fields (everything else stays default):
- Select VPC and More
- Name tag auto-generation:
HubVPC- Checkbox Auto-generate
- IPv4 CIDR block:
10.12.0.0.16 - NAT gateway:
In 1 AZ
It should look like this: 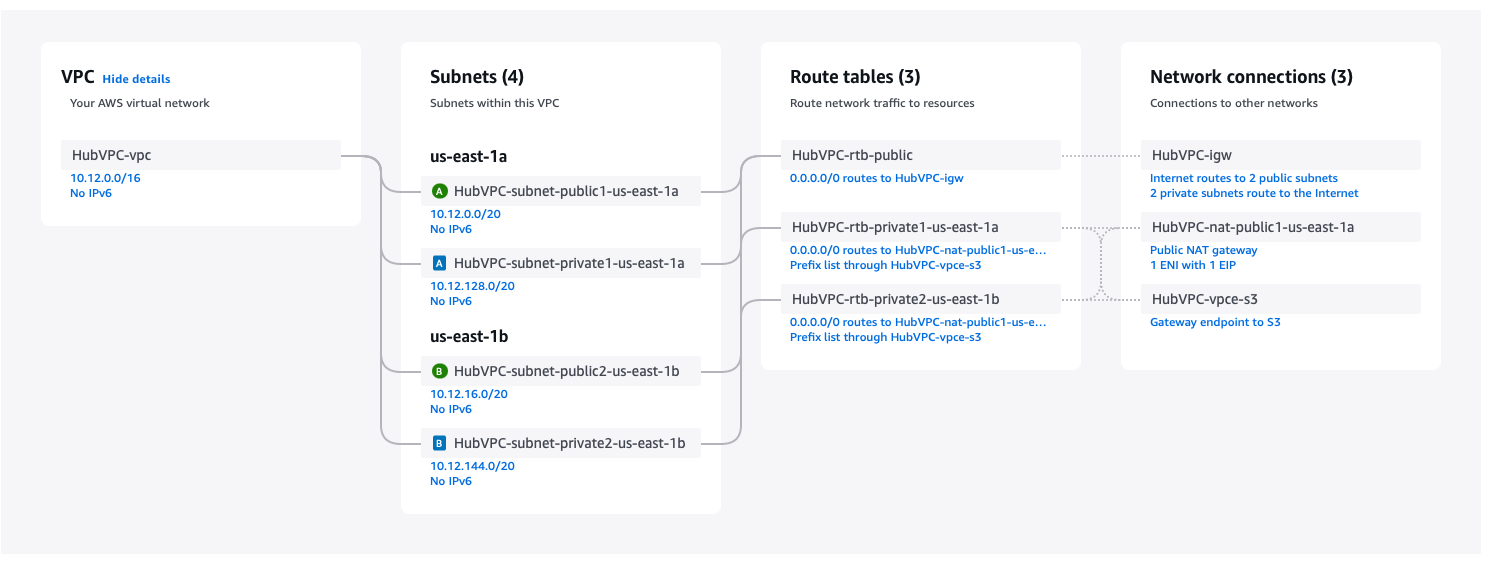
2) Create the Spoke VPC
- Go to VPC in AWS, click "Create VPC". Set the following fields (everything else stays default):
- Select VPC and More
- Name tag auto-generation:
SpokeVPC- Checkbox Auto-generate
- IPv4 CIDR block:
10.20.0.0.16 - NAT gateway:
In 1 AZ
It should look like this: 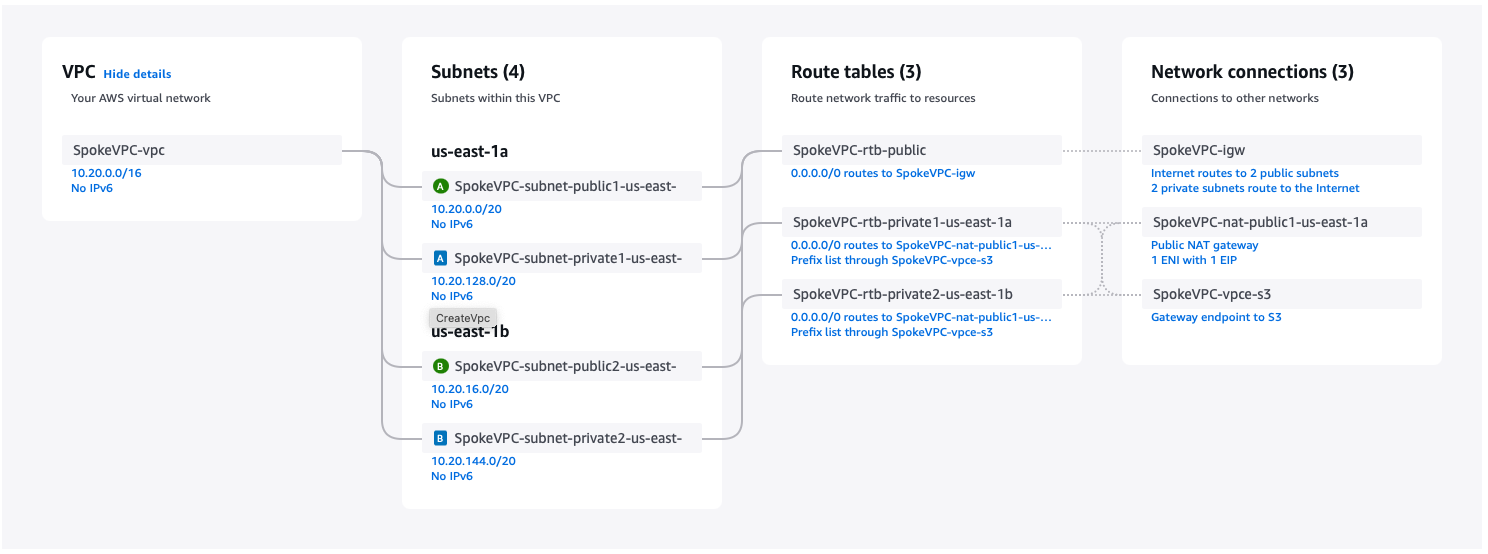
3) Add the "Primary" tag on the private subnet within the SpokeVPC
- In the Resource Map for the SpokeVPC-vpc VPC, click on the SpokeVPC-subnet-private1-[REGION] subnet
- Once in the subnet details page, click the Tags tab
- Hit Manage Tags button on far right
- Hit the Add new tag button
- Set the tag detail
- Enter Key:
primary - Enter Value:
true
- Enter Key:
- Hit Save
- For more detail see: Private Install -> Creating VPC Network -> Subnet Configuration.
Install Yellowbrick Deployer into public subnet of SpokeVPC
1) Ensure the minimum EC2 quota levels are available
- Go to Service Quotas
- Under "AWS Services" type EC2 in the search bar
- Select "Amazon Elastic Compute Cloud (Amazon EC2)"
- In the "Search by quota name" field type "Running On-Demand Standard"
- Ensure the account-level quota value is greater than 46
- If it isn't, click the link for "Running On-Demand Standard" and in the upper right corner, request an increase.
2) Pick Cloud Formation template
- Go to Cloud Formation and Select Stacks
- Hit the button to Create Stack (with new resources - standard)
- Keep the defaults: Choose an exiting template and AmazonS3 URL
- Copy the Deployer URL from the cloud documentation here: Cloud Install
- Amazon S3 URL:
[COPIED URL EXAMPLE: https://yb-installer-prod.s3.amazonaws.com/deploy/[VERSION NUMBER]/deploy-enterprise.json] - Hit NEXT Button
3) Specify stack details: (Other defaults are OK)
- Stack name:
yb-deployer-vpc-peering - VPC:
SpokeVPC-vpc - Subnet:
SpokeVPC-subnet-public1-[region]where region might be us-east-1a if installed in us-east-1 - Hit NEXT Button
- All defaults on this page are OK.
- Checkbox "I Acknowledge..."
- Hit NEXT again and wait ~5 minutes for deployment
4) Open the Deployer Wep Page
- Go to the Outputs tab of the newly completed stack
- There should be three outputs: DeployerAccessKey, DeployerIP, and DeployerURL
- Copy these values down for later reference. You'll use this same deployer to teardown the instance at the end.
- Click the DeployerURL link to open the deployer web page.
- Ignore any "Connection is not Private" warnings and open the page.
Use Deployer to install Yellowbrick Database into the private subnet of SpokeVPC
Once on the Yellowbrick Deployer, Click NEXT to go past the welcome screen
Click "Agree" and NEXT again to go past EULA
On the Provider page
- Instnace Name:
YellowbrickDB - Cloud Region:
us-east-1(or whatever region you setup the VPCs in) - Hit NEXT
- Instnace Name:
On the Restrict Access page
- Choose Private
- Hit NEXT
On Network page
- Under Infrastructure resrouces, using the dropdowns:
- Choose VPC:
SpokeVPC-vpc (10.20.0.0/16) - Primary Subnet:
SpokeVPC-subnet-private1-[Region]a (10.20.128.0/20) - Secondary Subnet:
SpokeVPC-subnet-private2-[Region]b (10.20.128.0/20) - Hit NEXT
On Initial Account page
- Click the Download it link to download the username and password
- This file should be called
yb-YellowbrickDB-credentials.txt
- This file should be called
- Alternatively, show the password and record it.
- NOTE: This is the only place that username/password will be shown to you.
- Hit NEXT
- Click the Download it link to download the username and password
On Storage page
- Keep the Create new storage buckets checked
- Hit NEXT
On Install page
- Hit INSTALL
- The install will take about 20 minutes.
- Keep this browser window open while its deploying, we will check status later.
- Continue below in another browser tab
Create HubVPC infrastructure
1) Create a Windows Jumpbox EC2 Instance in Public Subnet
- Go to EC2 / Instances
- Hit Launch Instance button on upper right
- Enter the fields:
- Name:
WindowsJumpbox - Application and OS Images:
- Click Windows Microsoft
Microsoft Windows Server 2025 BaseShould be selected.
- Instance Type:
t3.xlarge - Key pair (login)
- Click Create new key pair
- Enter key pair name:
hub-key - Hit Create key pair
- Save file: hub-key.pem
- Network Settings
- Network:
HubVPC-vpc - Subnet:
HubVPC-subnet-public1-[region]a - Select Create security group
- Checkbox Allow RDP traffic from:, select:
My IP - Hit Edit in upper right of Network Settings box
- Auto-assign public IP address:
Enable
- Network:
- Hit Launch Instance button on right
- Name:
2) Create a Linux ETL/Application Server in Private Subnet
- Go to EC2 / Instances
- Hit Launch Instance button on upper right
- Enter the fields:
- Name:
ETLTools - Application and OS Images:
- Click Ubuntu
Ubuntu Server 22.04 LTSshould be selected.- If a dialog opens up, hit Confirm changes
- Instance Type:
t2.xlarge - Key pair (login)
- Select previous key pair:
hub-key
- Select previous key pair:
- Network Settings
- Hit Edit in upper right of Network Settings box
- Network:
HubVPC-vpc - Subnet:
HubVPC-subnet-private1-[region]a - Select Create security group, then under Inbound Security Rule
- Click Add security group rule
- Type:
All TCP - Source type:
Custom - Source:
10.20.0.0/16
- Configure Storage
- You may want to increase storage if needed, default is 8 GB
- Hit Launch Instance button on right
- Name:
Setup Connectivity between VPCs
1) Peer HubVPC to SpokeVPC
- Go to Peering Connection in AWS
- Hit Create peering connection in upper right
- Enter the fields:
- Name:
Hub2Spoke - Select a local VPC to peer with: VPC ID (Requester): select
HubVPC-vpc - Under Select another VPC to peer with:
- Account:
My Account - Region:
This Region ([Region]) - VPC ID (Accepter):
SpokeVPC-vpc
- Account:
- Name:
- Hit Create peering connection button
- On the next screen, click the Actions Button and select
Accept request - A Dialog opens up with request details, click Accept request button
- On the DNS tab, click Edit DNS settings button on the right
- In the Edit DNS settings page,
- Under Request DNS resolution, checkbox
Allow accepter VPC - Under Accepter DNS resolution, checkbox
Allow requester VPC - Hit Save changes
- Under Request DNS resolution, checkbox
- In the Edit DNS settings page,
The VPC peering connection should look something like this: 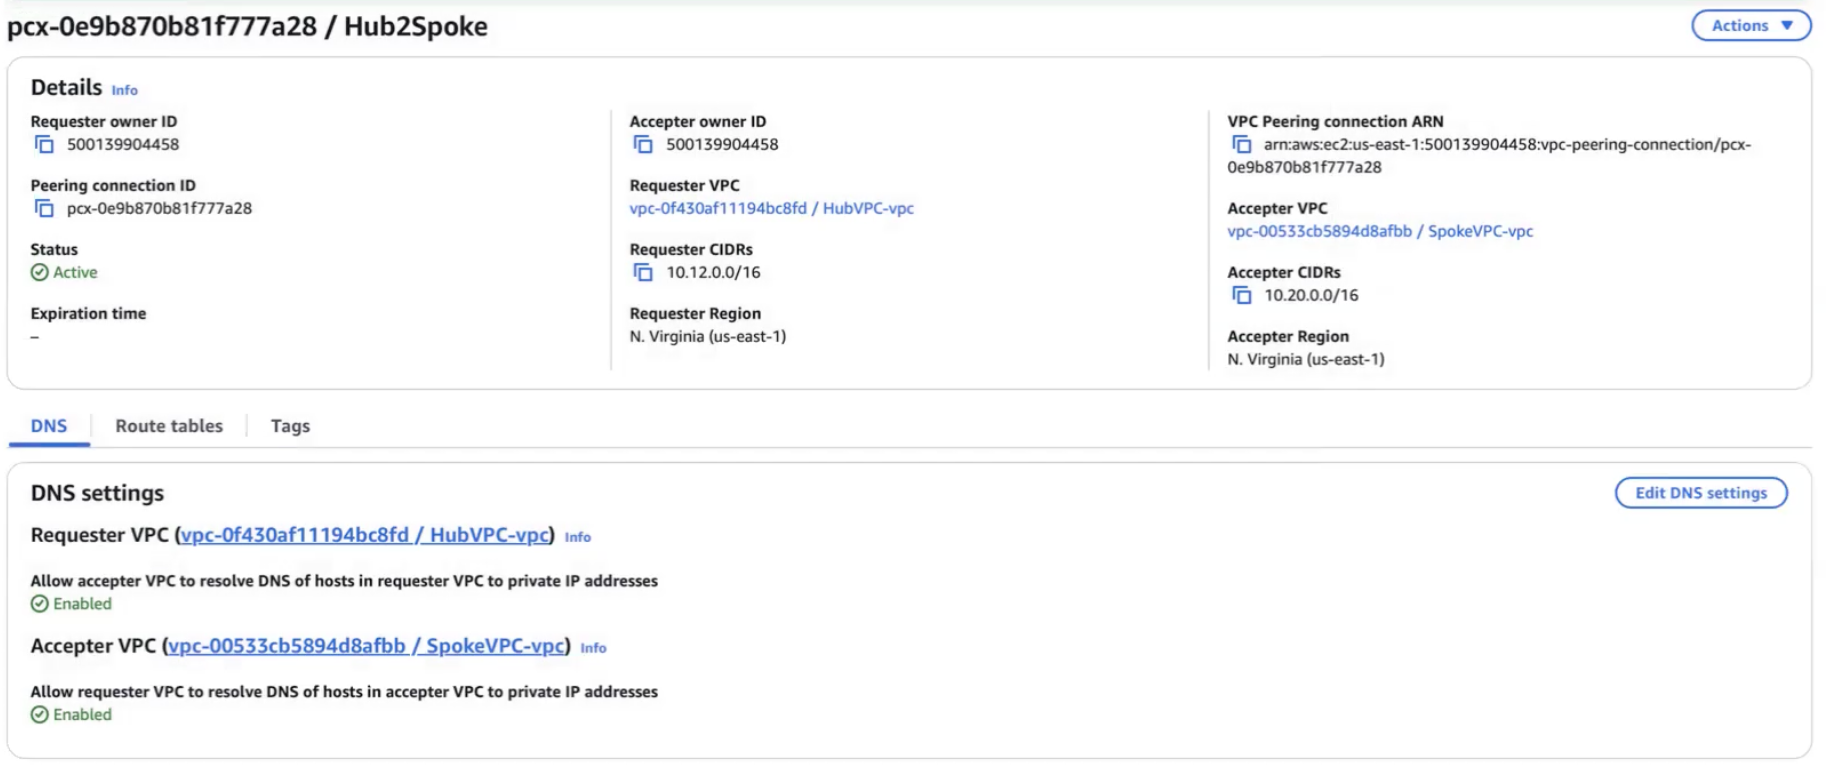
2) Setup Routes: Hub to Spoke
- Go to VPC, Your VPCs, and follow the link on VPC ID on
HubVPC-vpc - On the Resource map tab, under Route tables, click on HubVPC-rtb-public
- Click Actions in upper right, then select Edit routes
- Click Add route
- Destination:
10.20.0.0/16 - Target: Select
Peering connection, then selectHub2Spoke - Hit Save changes button
- Click Actions in upper right, then select Edit routes
2) Setup Routes: Spoke back to Hub (from both AZs and Public)
- Go to VPC, Your VPCs, and follow the link on VPC ID on
SpokeVPC-vpc - On the Resource map tab, under Route tables, click on SpokeVPC-rtb-private1-[Region]a
- Click Actions in upper right, then select Edit routes
- Click Add route
- Destination:
10.12.0.0/16 - Target: Select
Peering connection, then selectHub2Spoke - Hit Save changes button
- Click Actions in upper right, then select Edit routes
- Go to VPC, Your VPCs, and follow the link on VPC ID on
SpokeVPC-vpc - On the Resource map tab, under Route tables, click on SpokeVPC-rtb-private2-[Region]b
- Click Actions in upper right, then select Edit routes
- Click Add route
- Destination:
10.12.0.0/16 - Target: Select
Peering connection, then selectHub2Spoke - Hit Save changes button
- Click Actions in upper right, then select Edit routes
- Go to VPC, Your VPCs, and follow the link on VPC ID on
SpokeVPC-vpc - On the Resource map tab, under Route tables, click on SpokeVPC-rtb-public
- Click Actions in upper right, then select Edit routes
- Click Add route
- Destination:
10.12.0.0/16 - Target: Select
Peering connection, then selectHub2Spoke - Hit Save changes button
- Click Actions in upper right, then select Edit routes
Check connectivity between Hub and Spoke
1) Check install of Yellowbrick
- Go back to the Yellobrick Deployer tab
- Ensure the deployer finished installing Yellowbrick
- Save the Yellowbrick Manager URL
2) Log in to Windows Jump Box
- In AWS, go to EC2, Instances and click the instance ID for your WindowsJumpBox
- Hit the Connect button in the upper right
- Switch to the RDP Client tab
- Hit the Download remote desktop file, save this file:
WindowsJumpbox.rdp - Click the Get password link
- Hit the Upload private key file button
- Select the
hub-key.pemfile we saved earlier - Hit the Decrypt passsword button
- Save the Password somewhere as
JumpboxPassword - Open the
WindowsJumpbox.rdpfile - When prompted, paste the
JumpboxPasswordinto password field and hit Continue
3) Connect to Yellowbrick Manager
- From within the Windows Jumpbox
- Open up Microsoft Edge browser
- Copy the Yellowbrick Manager URL saved from the deployer in Step 1 above
- Enter the credentials stored in
yb-YellowbrickDB-credentials.txt - You should now have connectivity to the Yellowbrick Manager from the public subnet of the Hub VPC
- Within the Yellowbrick Manager, go to the Instance Management homepage and save the Hostname as
DBHostName- Click the clipboard icon next to the tip of the red arrow below:
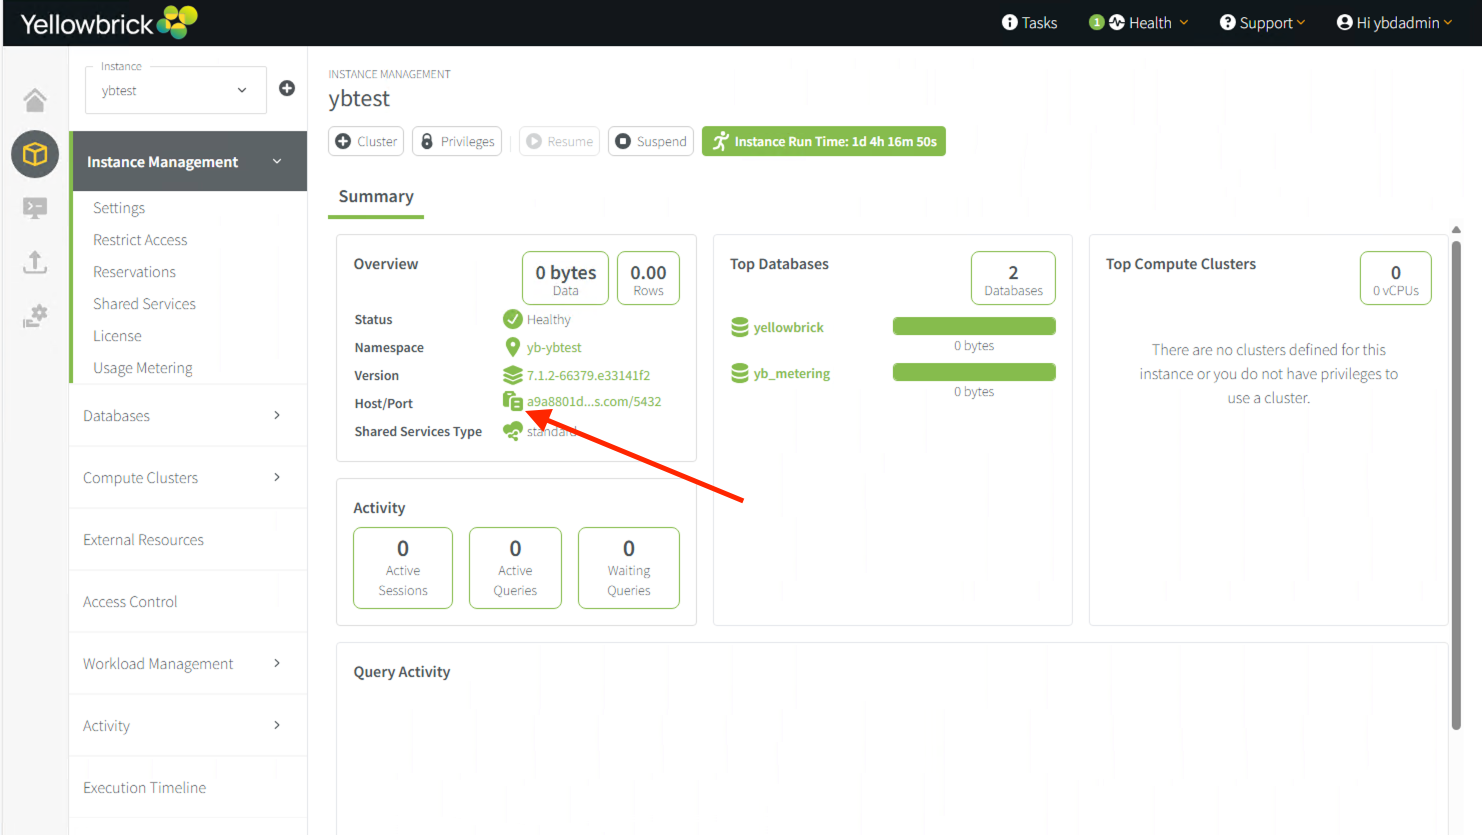
- Click the clipboard icon next to the tip of the red arrow below:
4) Connect to Yellowbrick Database
- From AWS, go to EC2, Instances and click the Instance ID for the ETLTools instance
- Copy the Private IPv4 address for the ETLTools instance, save this somewhere as
ETLToolsIP - From within the Windows Jumpbox
- Open up Windows Powershell
- Create a SSH .PEM file
- Open up the
hub-key.pemfile in a text editor - Copy the contents into the clipboard
- Type
@"at the powershell prompt and hit return - Paste the contents of the clipboard (the hub-key.pem file) and hit return
- Type
"@ | Out-File -FilePath ssh.pem -Encoding asciiand hit return. This makes the ssh.pem file.
- Open up the
- At the powershell prompt type:
ssh -i ssh.pem ubuntu@[ETLToolsIP]- If prompted, say Yes
- You should now be logged in as user
ubuntuon ETLTools box in the private subnet. This subnet has access to the database instance. - Type
nc -zv [DBHostName] 5432 - This confirms connectivity between the ETLTools box and the Yellowbrick Database Instance
Next Steps
- Using the Yellowbrick Manager
- Install a License
- Setup a compute cluster
- Load and query sample data
- Download and Install YBTools on the ETLBox and use the tools to load data into Yellowbrick
- Setup other linux servers in the private subnet to host Data Applications