Appearance
Creating a New Stack
This section explains how to use AWS CloudFormation to install Yellowbrick software images that create and run a Yellowbrick data warehouse in a VPC (either a new VPC with a public network or an existing VPC with a private network). In CloudFormation, this installation process is known as creating a stack. Creation of a stack implies the creation of a number of sub-stacks that belong to the root stack, as well as the creation of dependent resources such as roles and buckets.
The expected amount of time to complete a deployment is around 15-30 minutes.
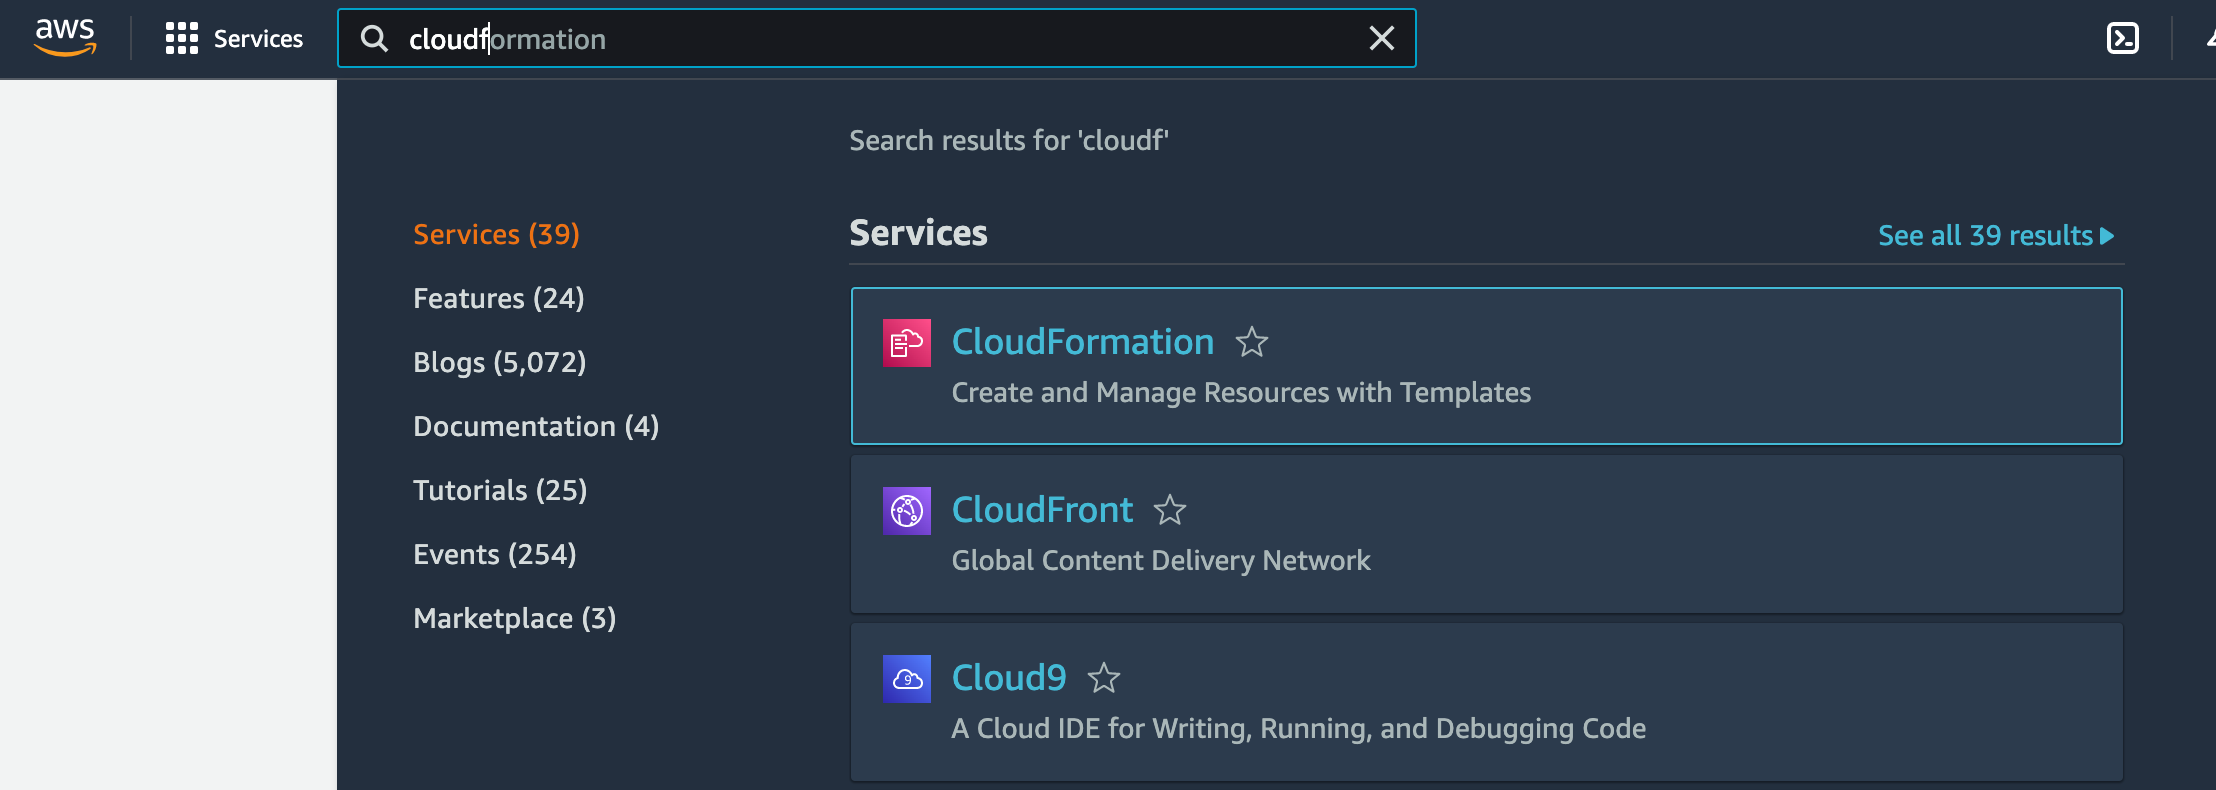
Go to the CloudFormation service
Log into your AWS account and find the CloudFormation service. Click CloudFormation to proceed.
Create stack
Select With new resources (standard) under Create stack:

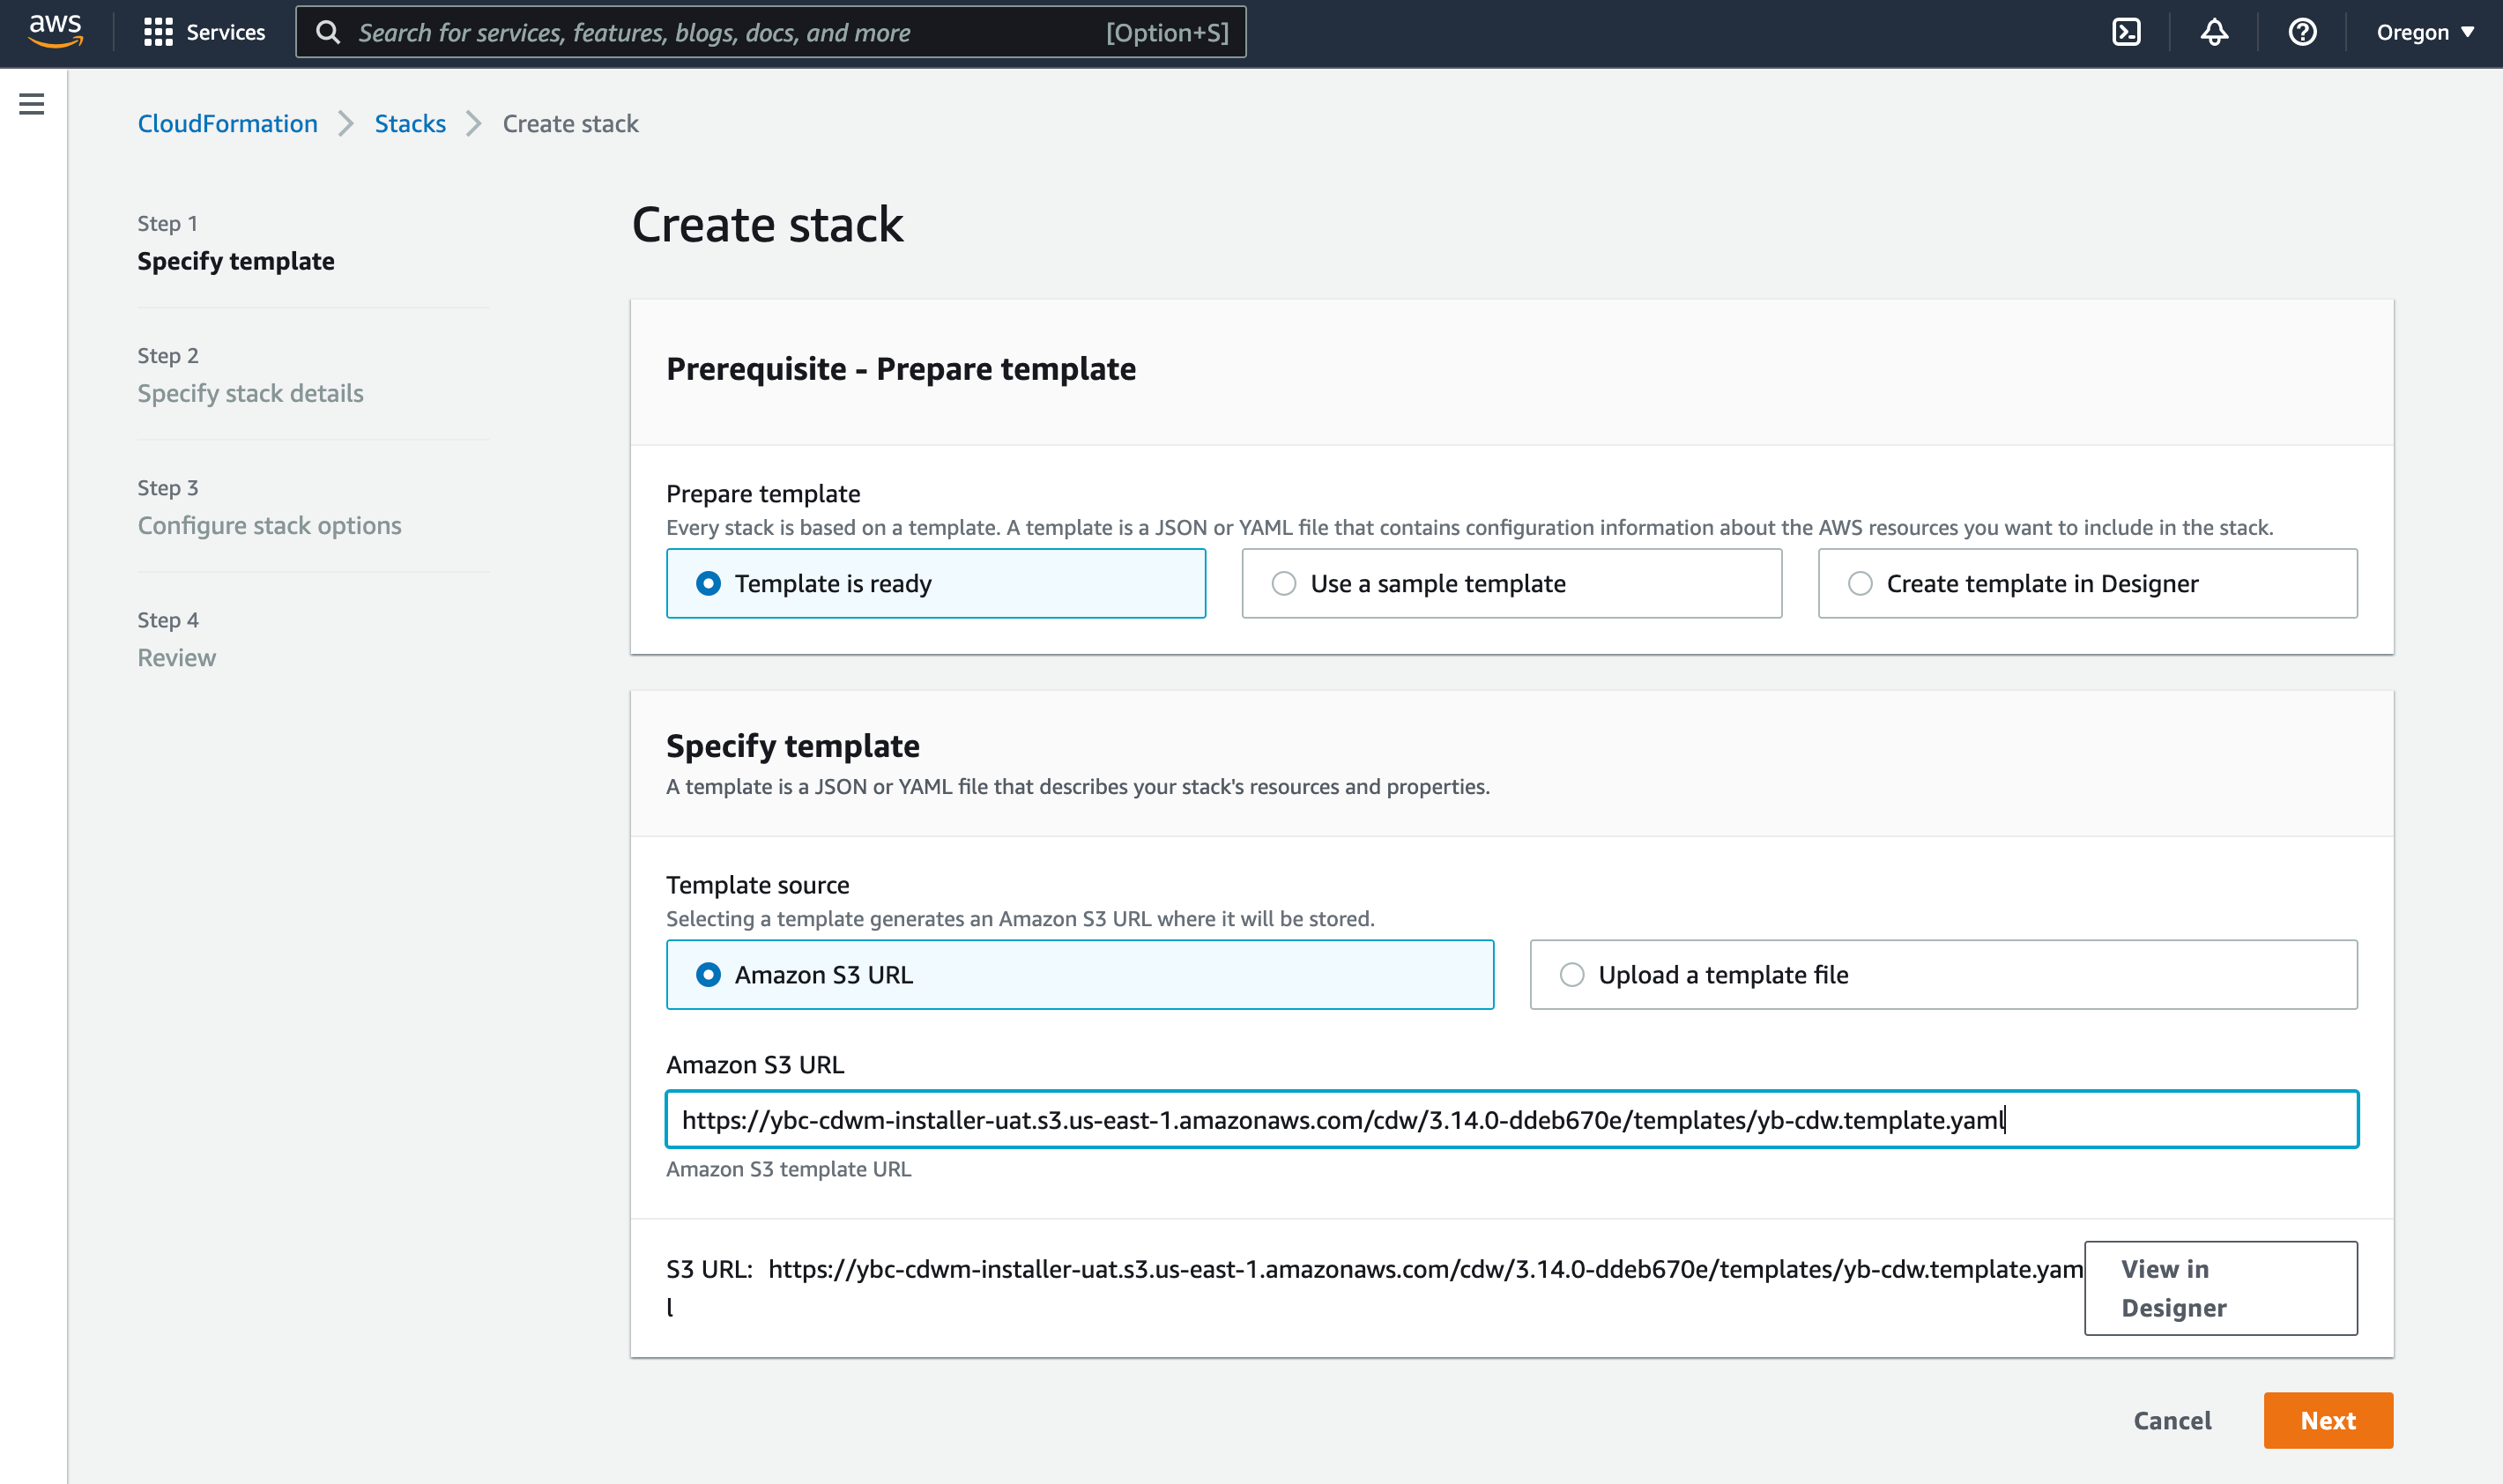
Specify template
Accept the default Template is ready option, then fill in the Amazon S3 URL field. The template URL has the following form:
https://ybc-cdwm-*****************.template.yamlThe complete template URL will be provided to you.
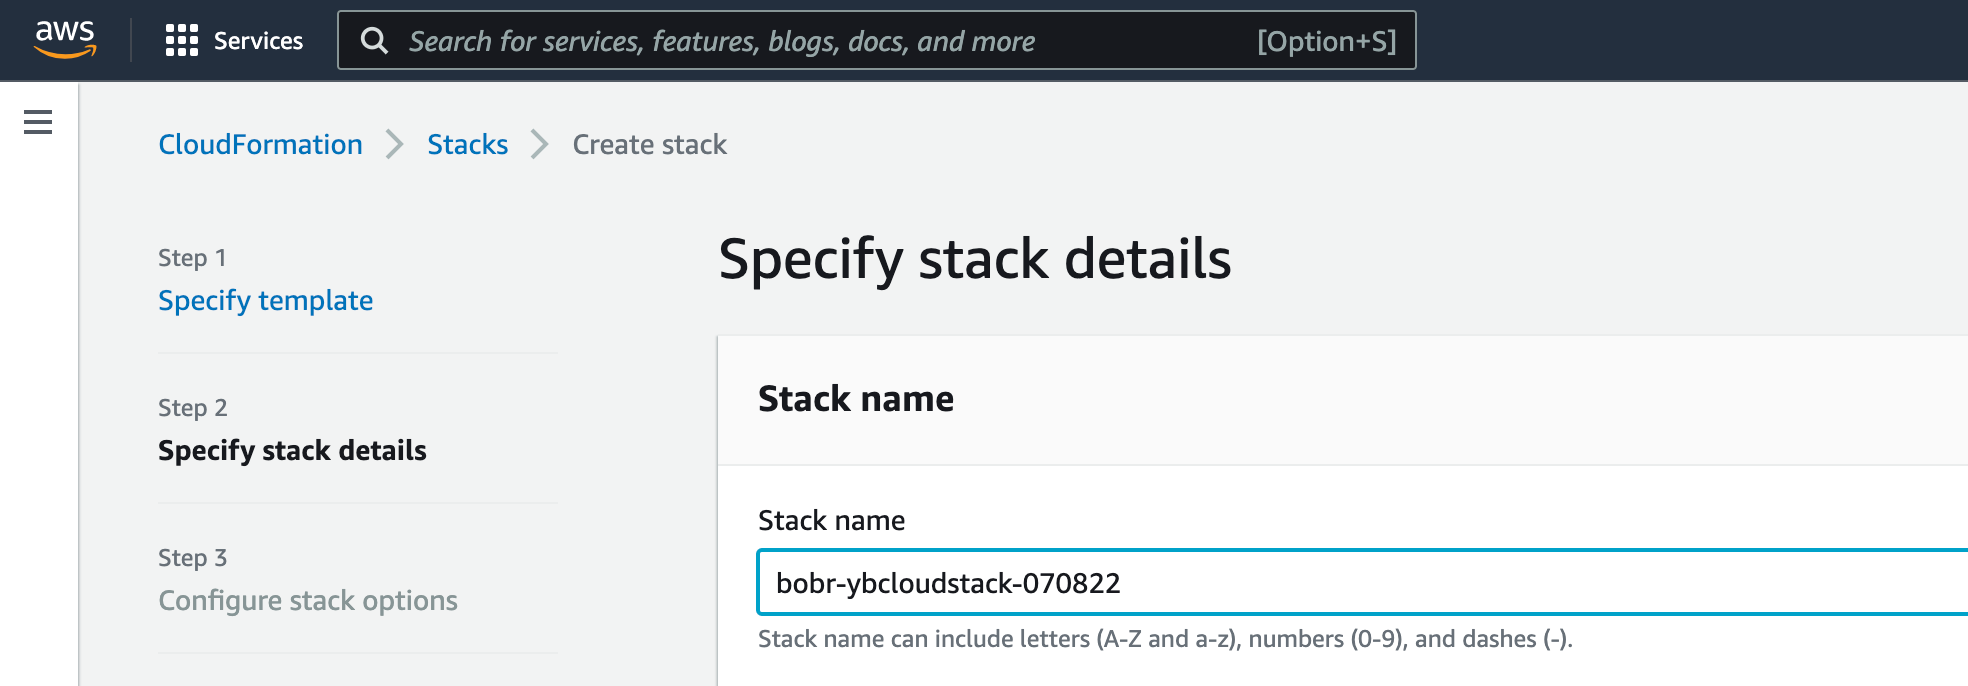
Name the stack
Give the new stack a unique and meaningful name, as shown here:
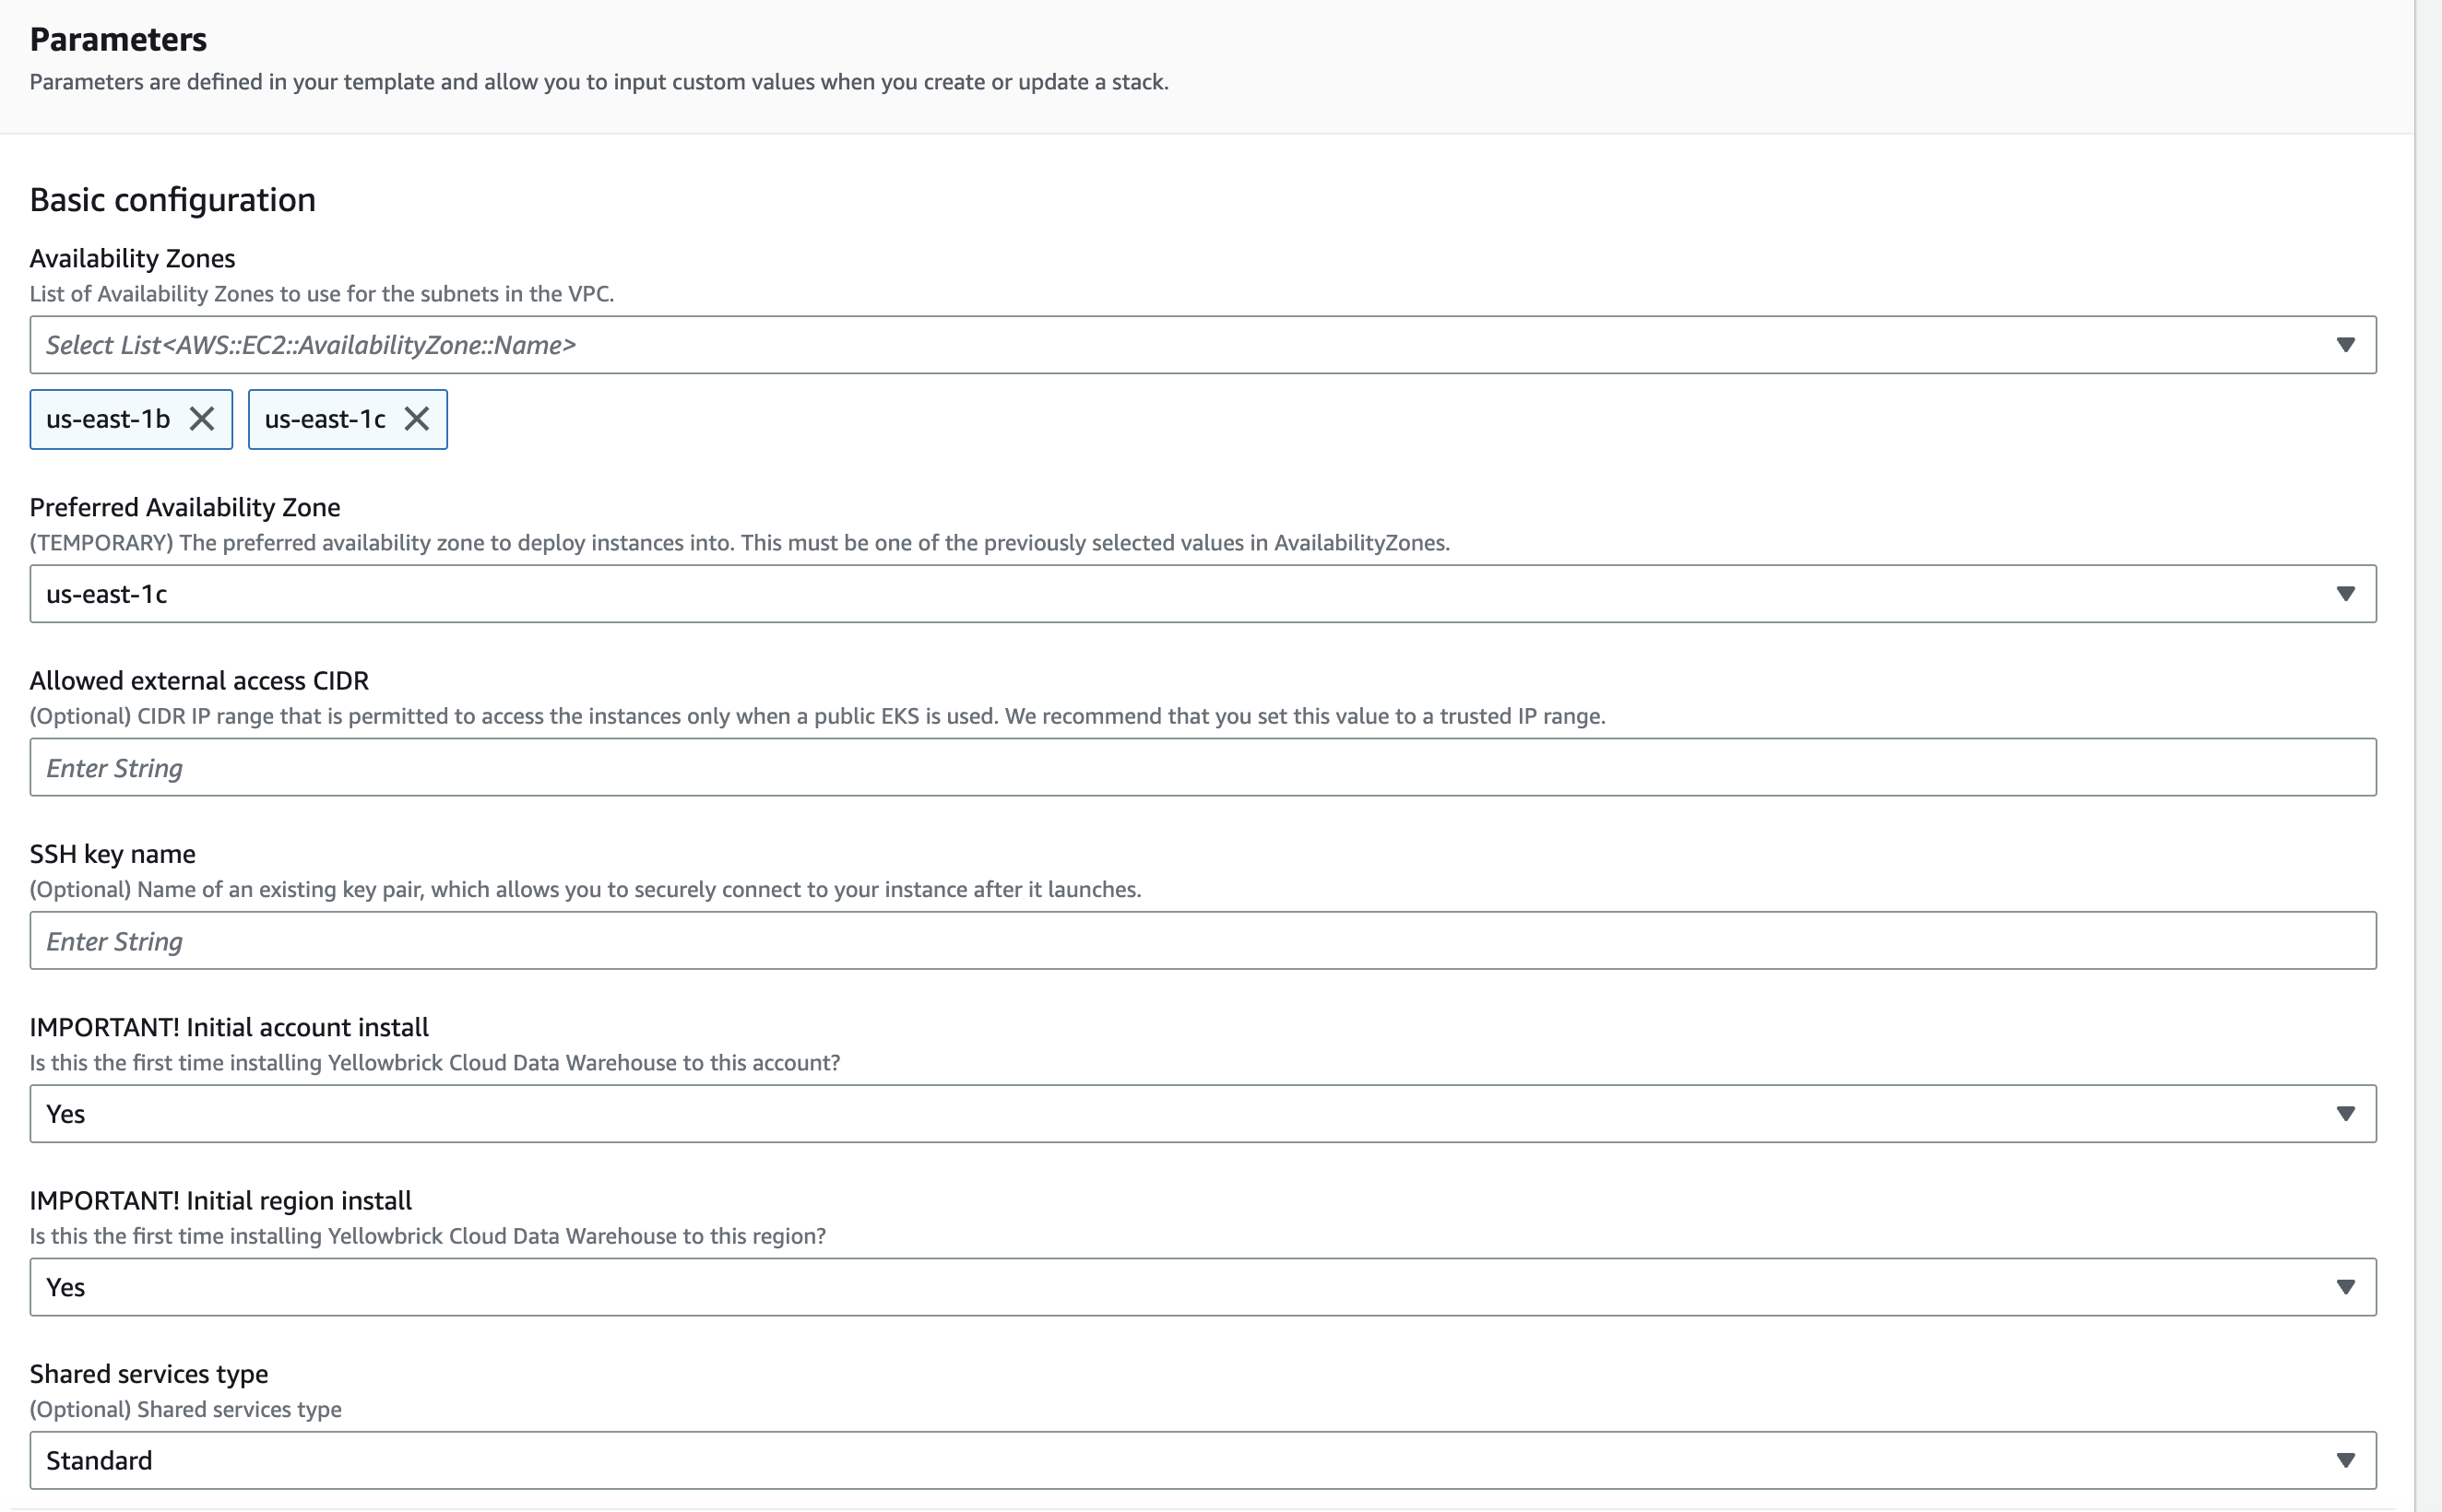
Configure basic parameters
Enter the basic configuration parameters for the stack as follows.
You must select at least two availability zones from the list. The zones available to you depend on the AWS account you are using. Also enter a preferred zone.
Although you need at least two zones for the installation, ODCRs only need to be created for one zone. Keep in mind that the installation depends on these ODCRs, and they must be available in the preferred zone specified during installation. If you have any difficulty securing reservations in your preferred zone, you may need to pick a different preferred zone where reservations can be made.
The Allowed external access CIDR field may be left blank and is not recommended for use. However, if you do enter an IP range, you also need to provide an SSH key name for secure connections to the data warehouse from clients in that range when the installation is complete.
Shared services type defaults to Standard. You can modify the type to Scaled if you intend to run Yellowbrick Version 6.3 on a larger scale. Scaled shared services are recommended when you expect to have more than 100 active users and expect to need more than 5TB of data storage.
The Scaled setting preserves the default shared services configuration that was available in previous 6.x versions. The Standard setting represents a smaller node-group configuration that was not available in previous versions, and implies lower overall cost for AWS resources.
Regardless of the shared services type that you select during installation, you can change the type as needed for individual data warehouse instances when you create them in Yellowbrick Manager. You can also change the type for CDWM. If you know you are going to need scaled shared services (larger data warehouse instances), or have used them by default in previous 6.x versions, you should select Scaled during installations and upgrades. For new customers, the default Standard type is both cost-effective and a good starting point. You can upgrade to Scaled anytime, as needed.
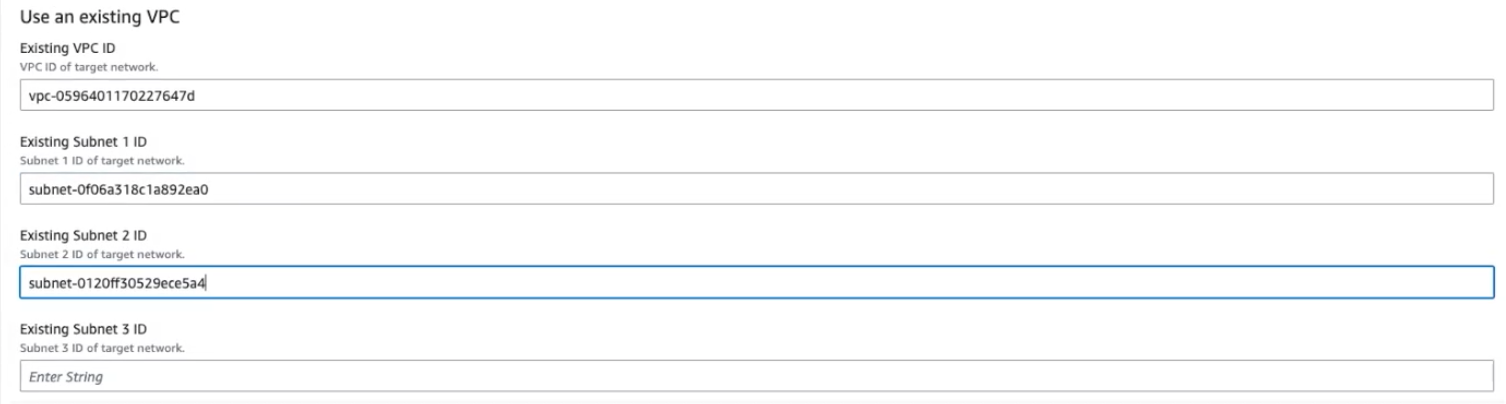
Use an existing VPC
Fill out this section only if you are deploying Yellowbrick software into an existing VPC with a private network and you have configured all the prerequisites. (When you fill out these fields, anything entered under Create a new VPC will be ignored.)
Enter your VPC ID and at least two subnet IDs.
You can copy and paste the IDs by going to VPC dashboard > Your VPCs and Subnets. See Prerequisites for Private Network Installs.
Create a new VPC
Fill out this section only if you want the installer to create a new VPC with a public network. If you intend to use an existing VPC with a private network, go back to the previous section and fill out those fields.
To create a new VPC for the installation, accept all the defaults.
The recommended network size is displayed by default. Several hundred IP addresses are typically required for a Yellowbrick deployment. If you want to implement a custom IP range for the network that does not match the default values, you must consult Yellowbrick Customer Support first. To provide a sufficient number of available IP addresses, Yellowbrick Version 6.x VPCs require subnets with a CIDR prefix of /24 or lower. Using a subnet with a prefix of /27 (for example), will result in a stack failure.

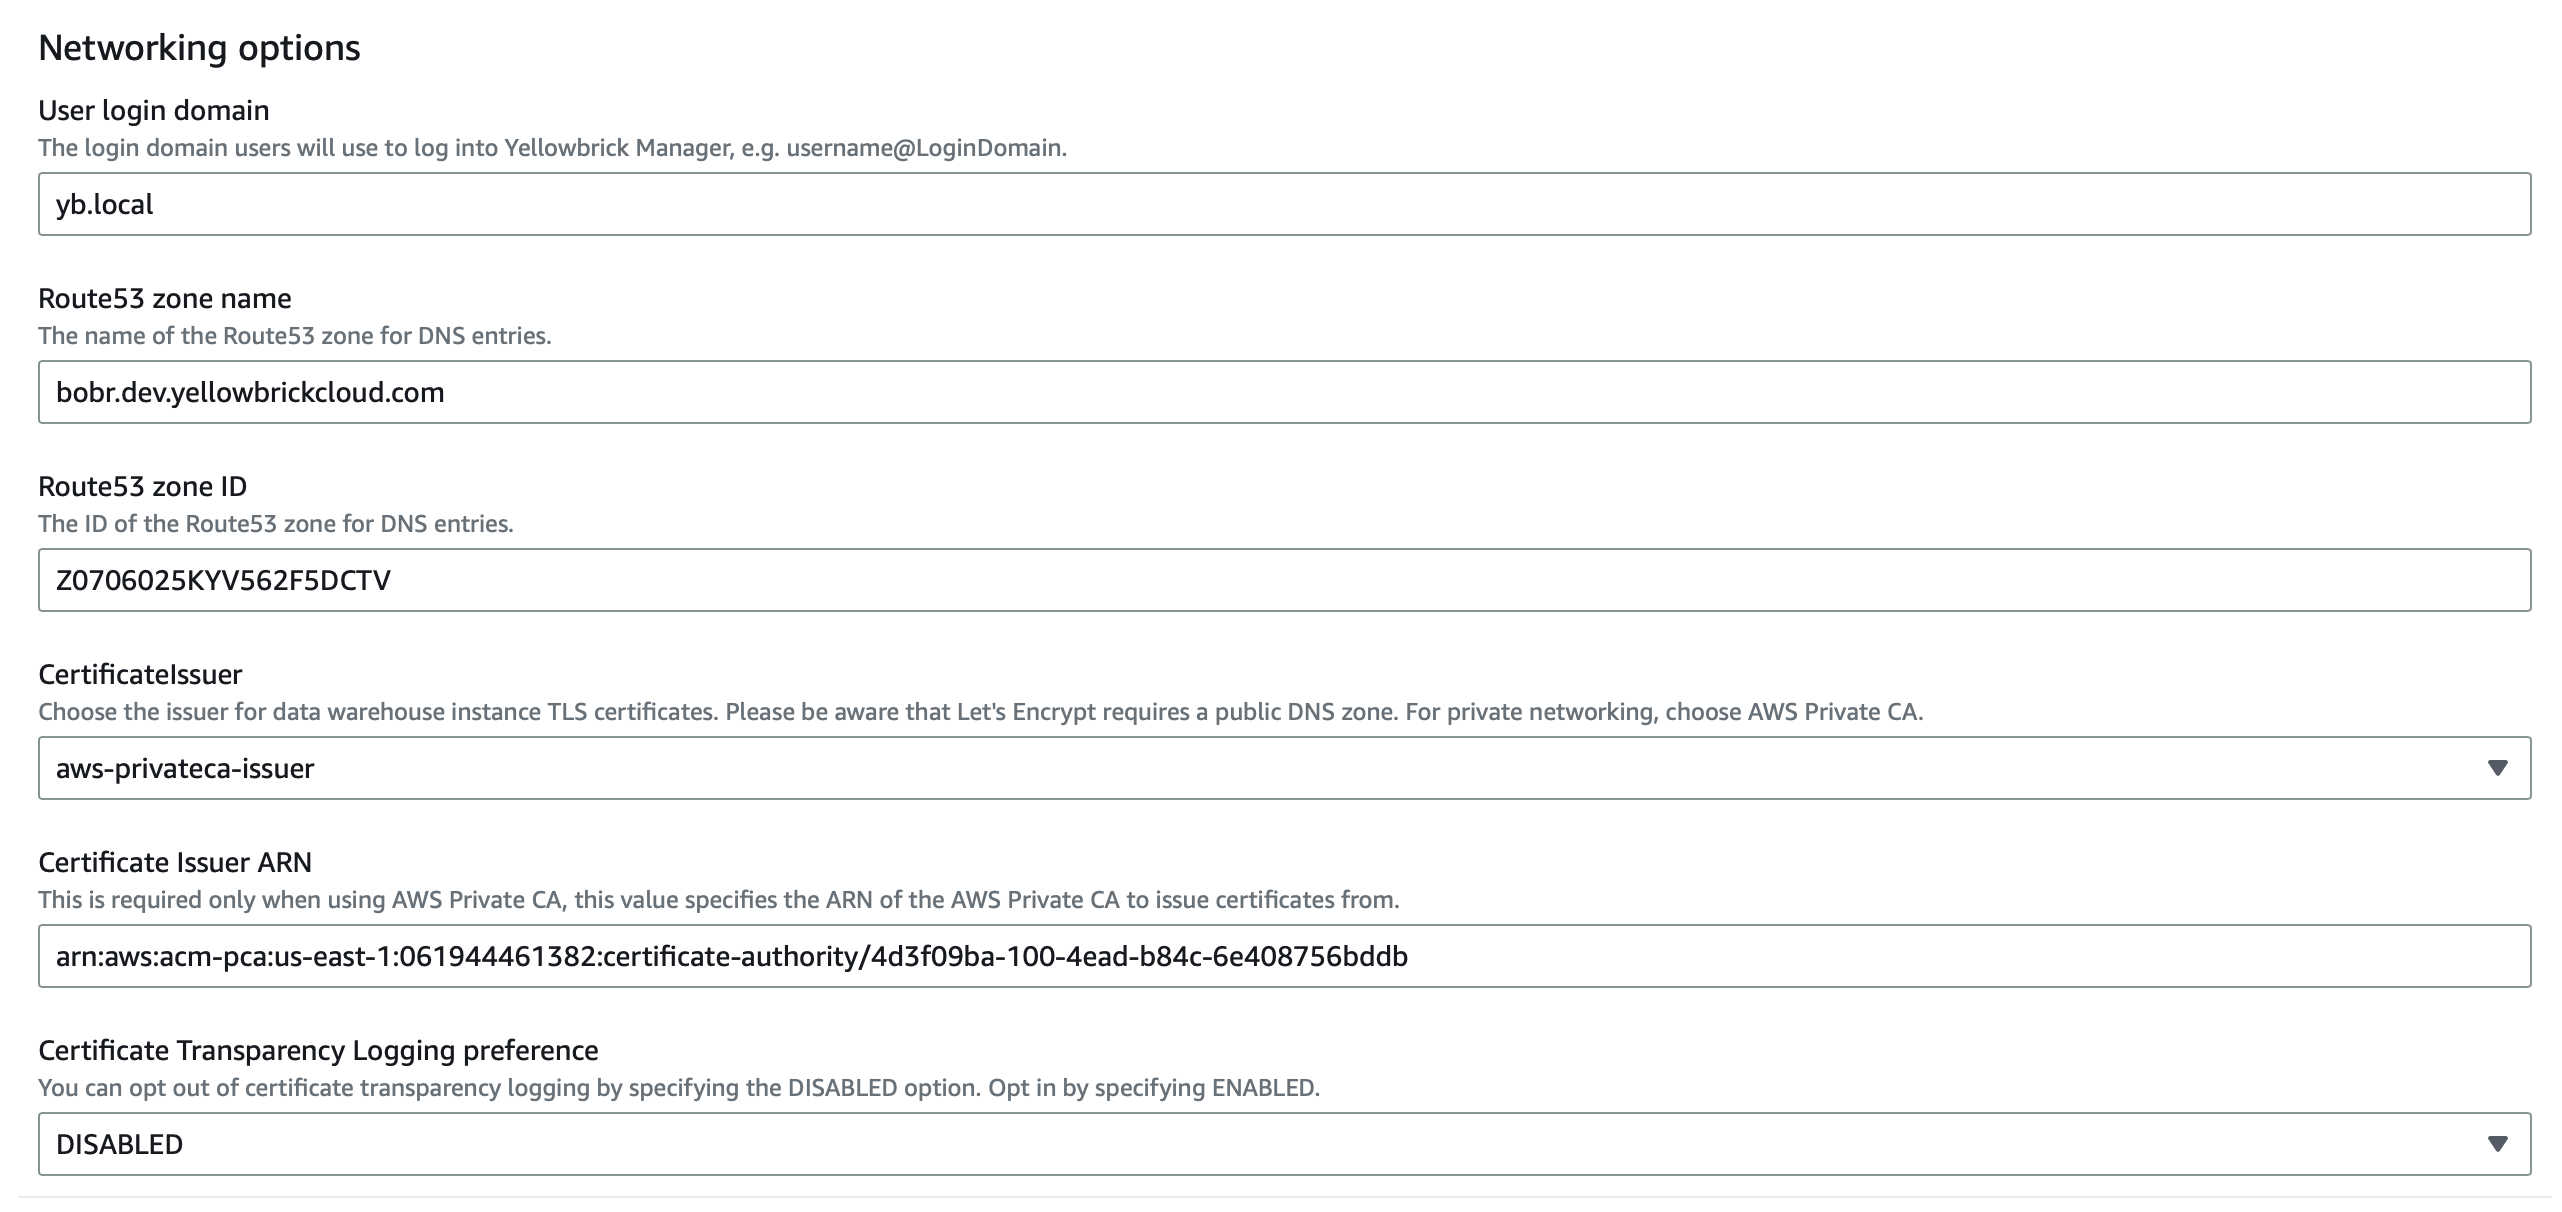
Networking options
This section applies to both private network and public network VPCs.
Enter the user login domain name, and the name and ID of a Route53 zone that is visible to your account. (This is a critical prerequisite; see Create a Route 53 Hosted Zone.) For private network installations, the hosted zone type must be private.
Under CertificateIssuer, select aws-privateca-issuer. Then copy and paste the ARN from the PCA record; in the console, go to AWS Private Certificate Authority).
Change Certificate Transparency Logging preference to ENABLED.
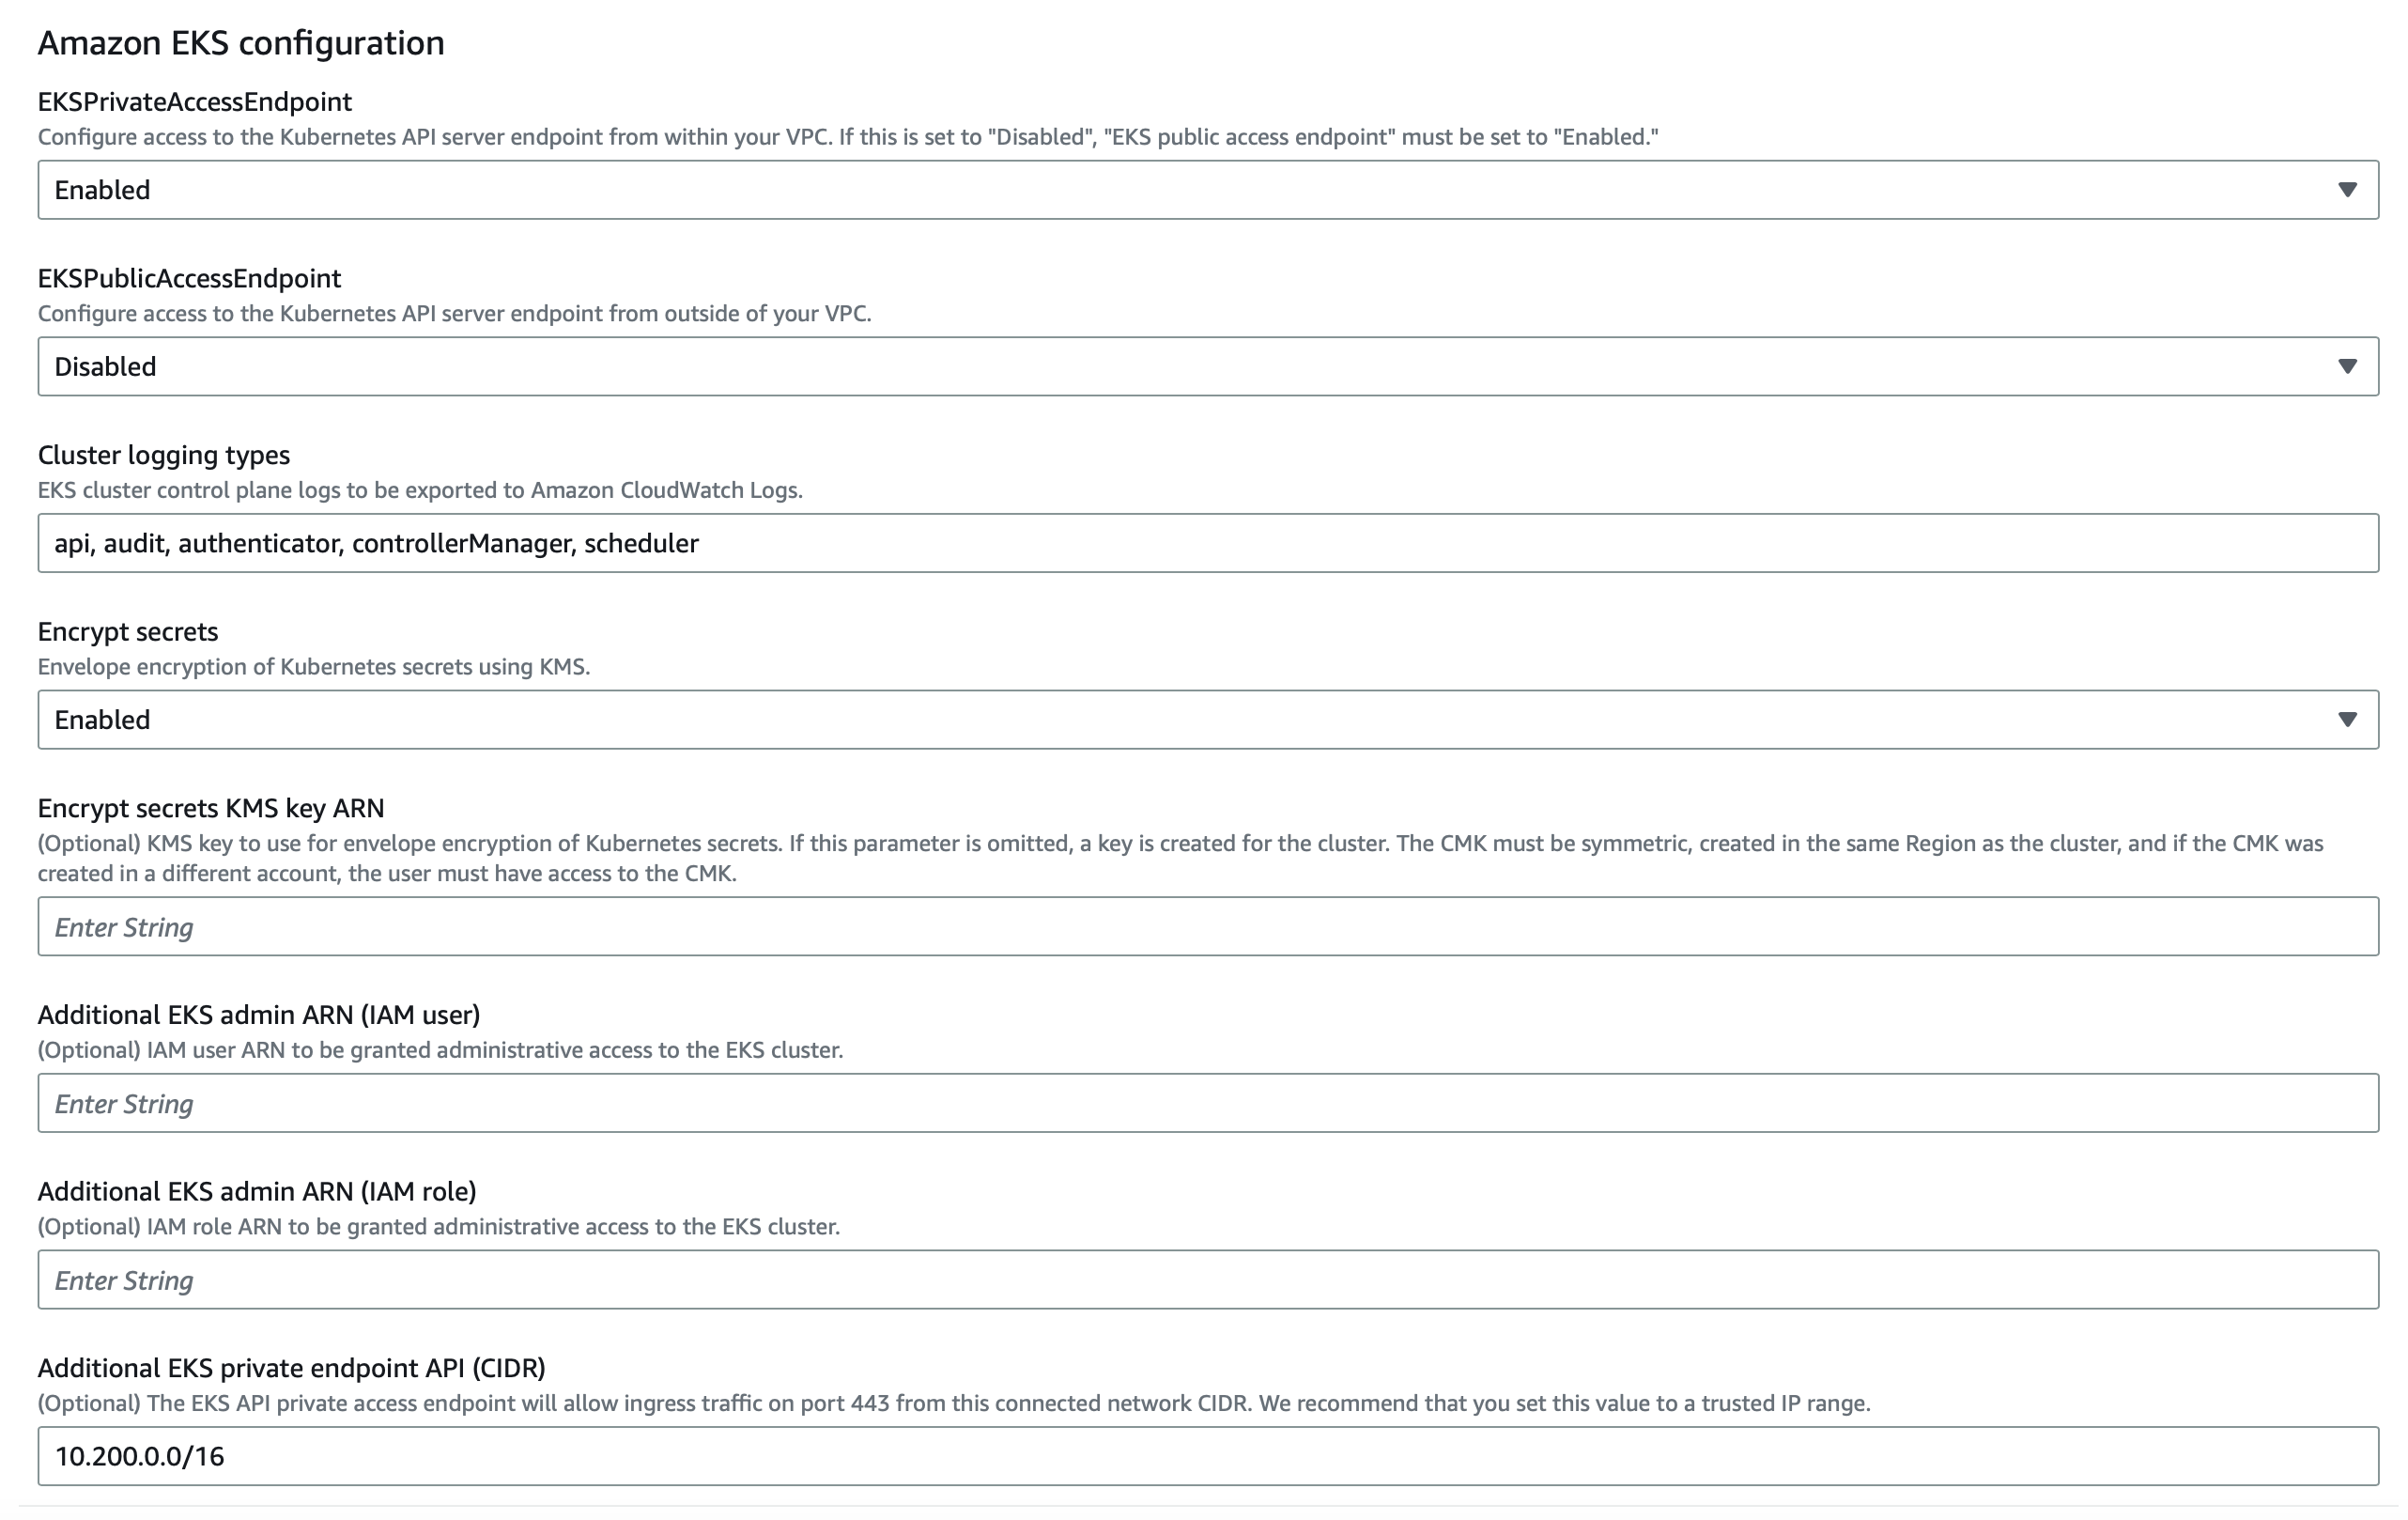
Amazon EKS configuration
Set EKSPublicAccessEndpoint (the second field) to Disabled.
Accept the defaults for the other fields.
Optionally, you can fill out the last field: Additional EKS private endpoint API (CIDR). This CIDR gives administrators access to the EKS private endpoint from a range of IP addresses on a peered network, such as from a hub VPC to a spoke VPC where Yellowbrick is installed. Administrators will be able to use tools such as kubectl to access the underlying Kubernetes software.
For example, a good broad entry would be 10.0.0.0/8. You can enter a comma-separated list in this field. For example: 10.0.0.0/16, 10.200.0.0.16.
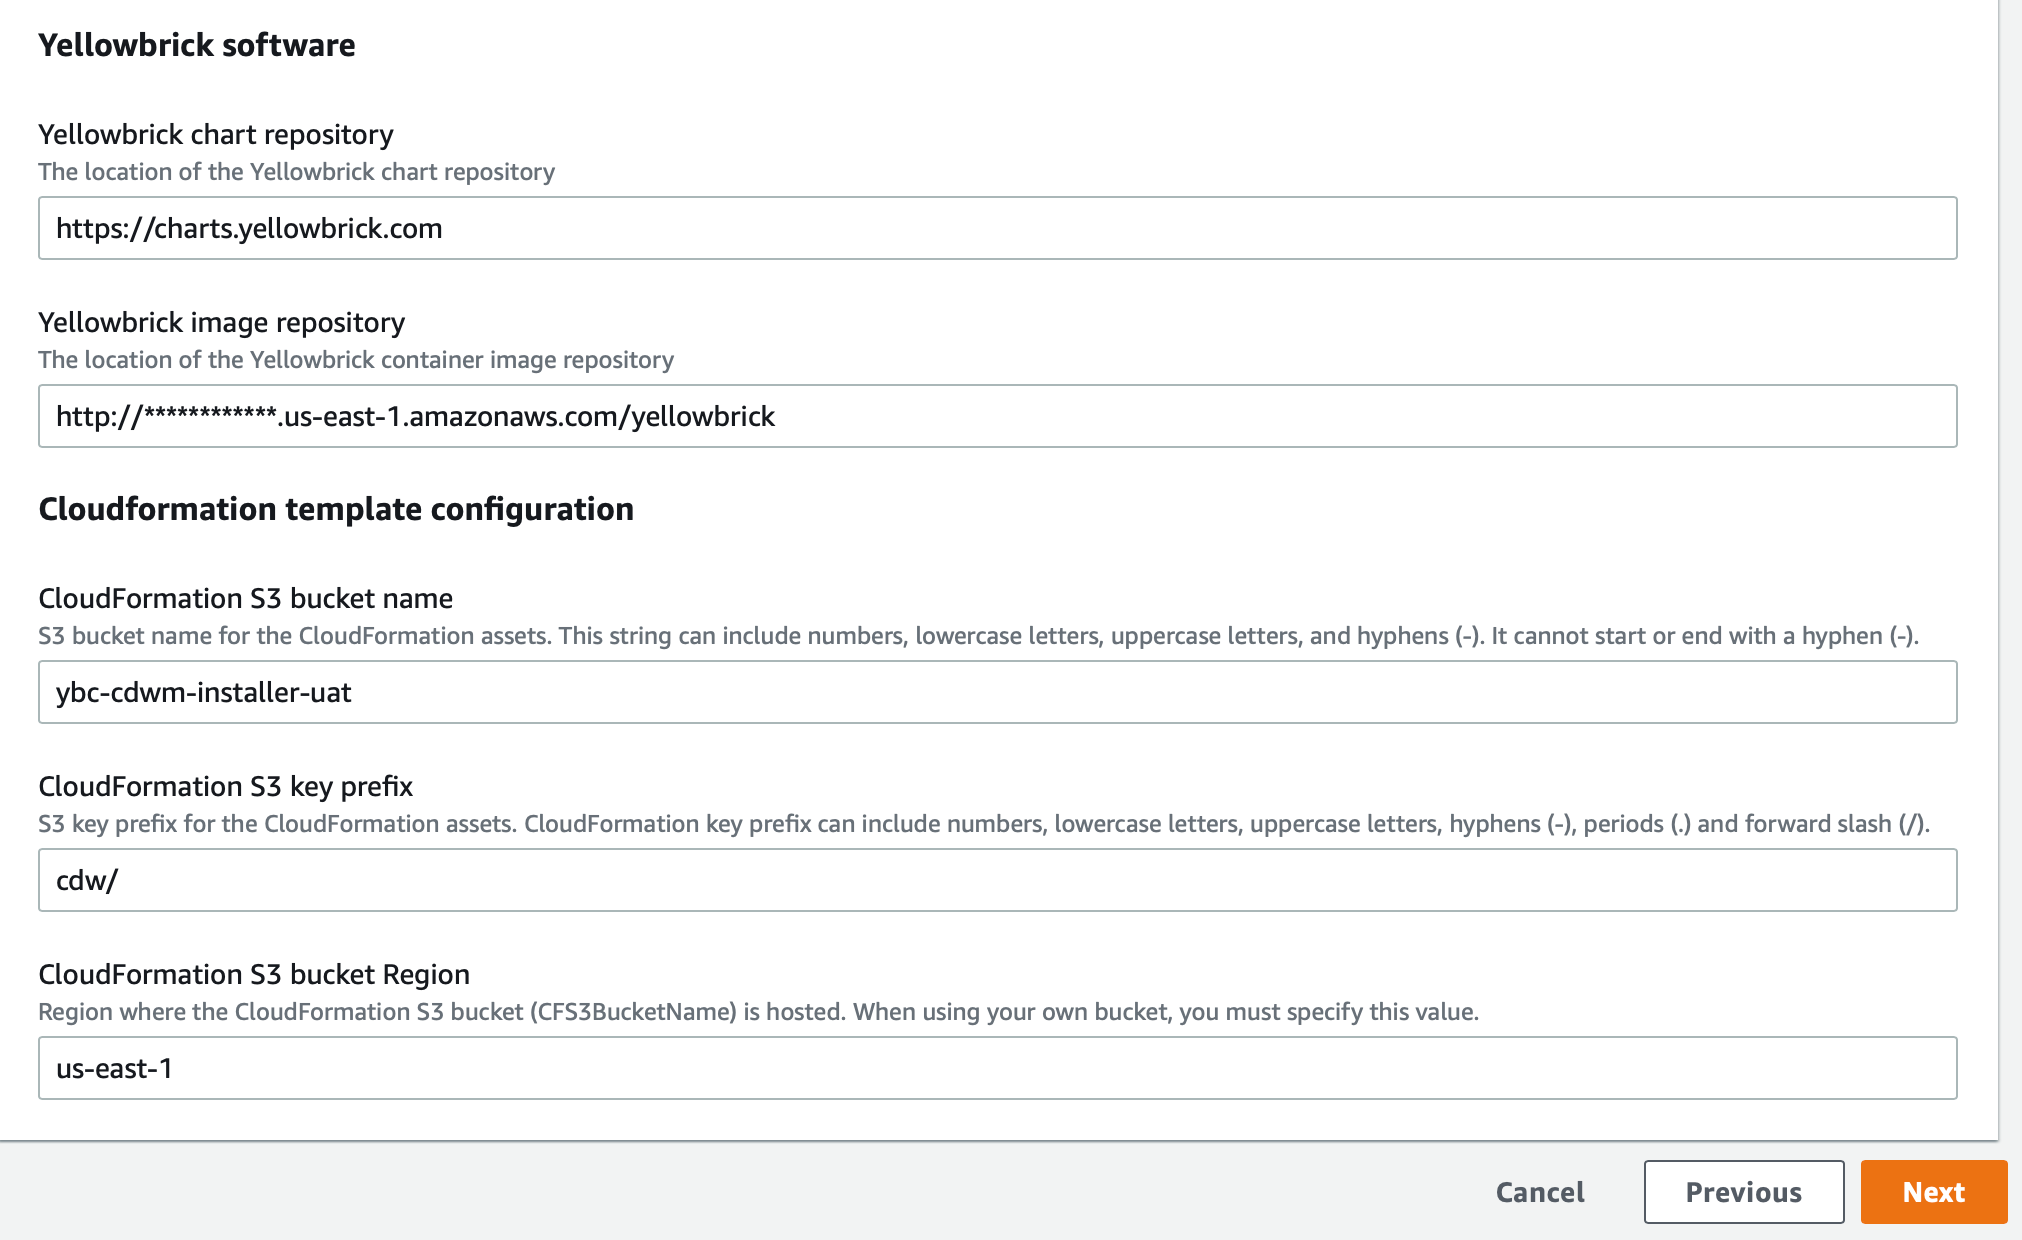
Identify Yellowbrick software repositories and CloudFormation bucket information
Enter the locations of the Yellowbrick repositories where the Helm charts and software images can be retrieved.
- Yellowbrick chart repository (the current location will be provided before you start the installation):
https://ybc-cdwm-installer-prod.s3.amazonaws.com/cdw/**************/charts- Yellowbrick image repository (the current location will be provided before you start the installation):
http://************.us-east-1.amazonaws.com/yellowbrickEnter the name, key prefix, and region of the S3 bucket that CloudFormation uses for the installation. These entries must be the exact strings that are provided before you start the installation.
Set the stack failure option and ignore advanced options
Click Next to move past this options screen.
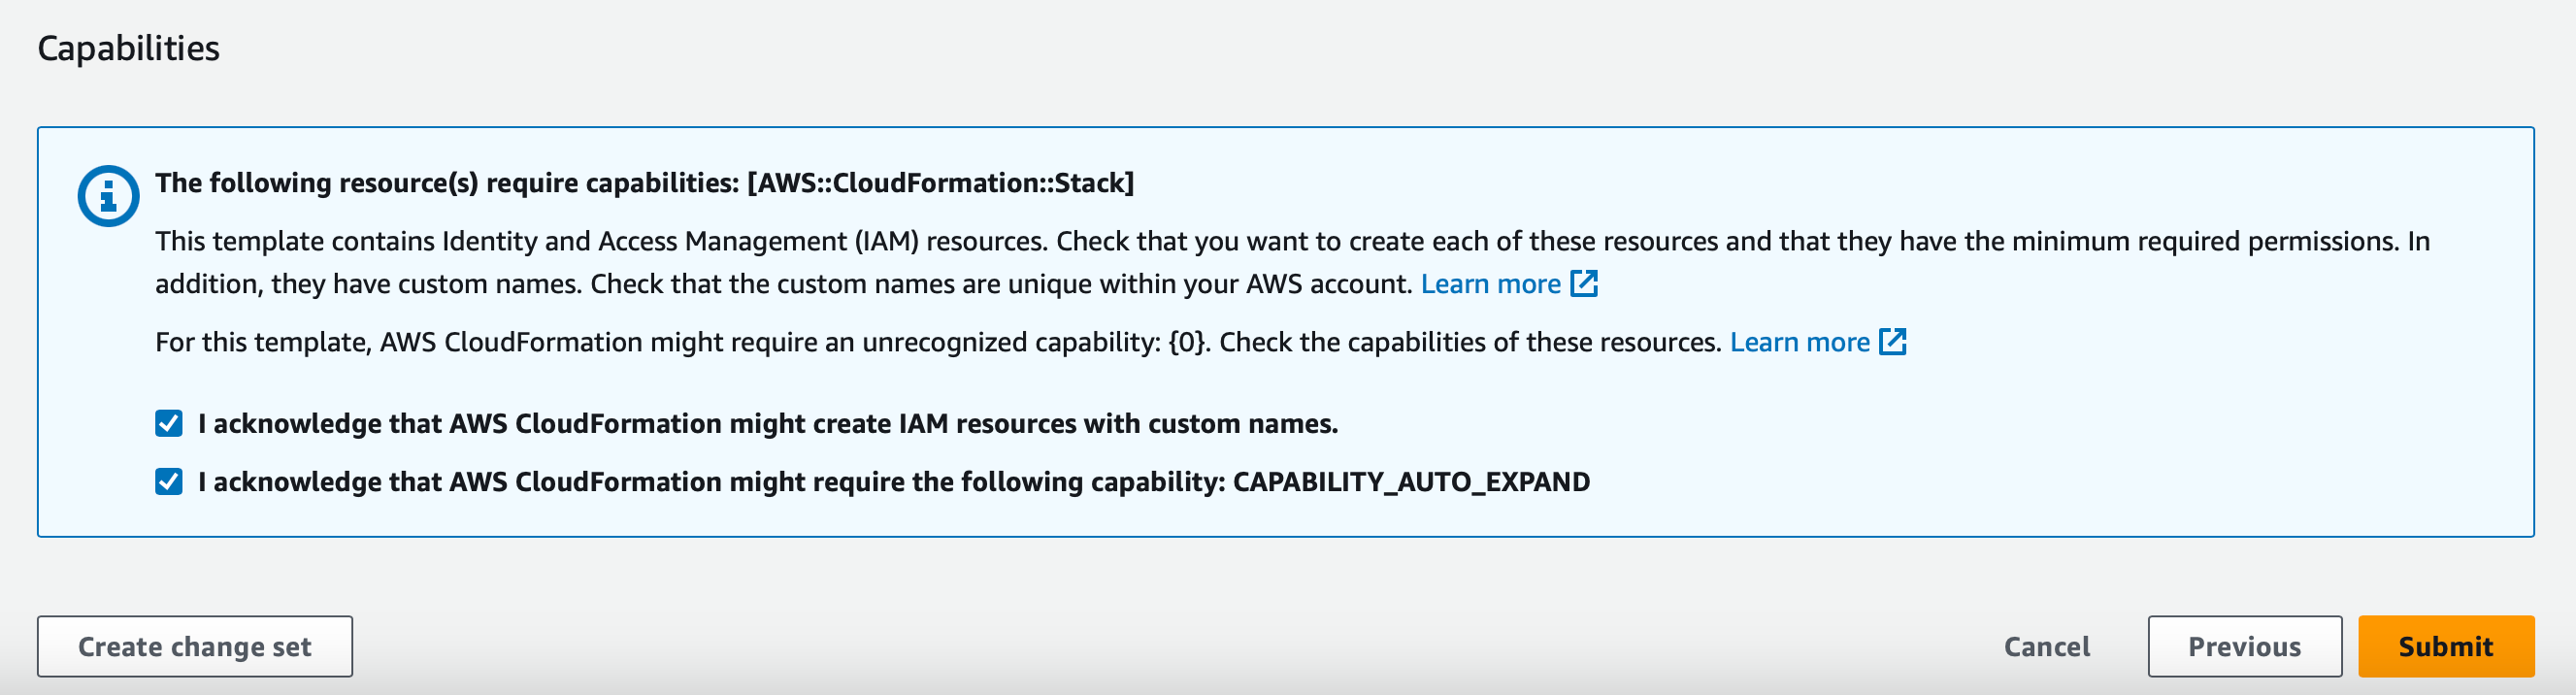
To preserve artifacts of a failed installation, instead of rolling everything back, select the Preserve successfully provisioned resources option. If a failure occurs, the cause of the failure will be easier to debug.
None of the advanced options need to be set or adjusted.
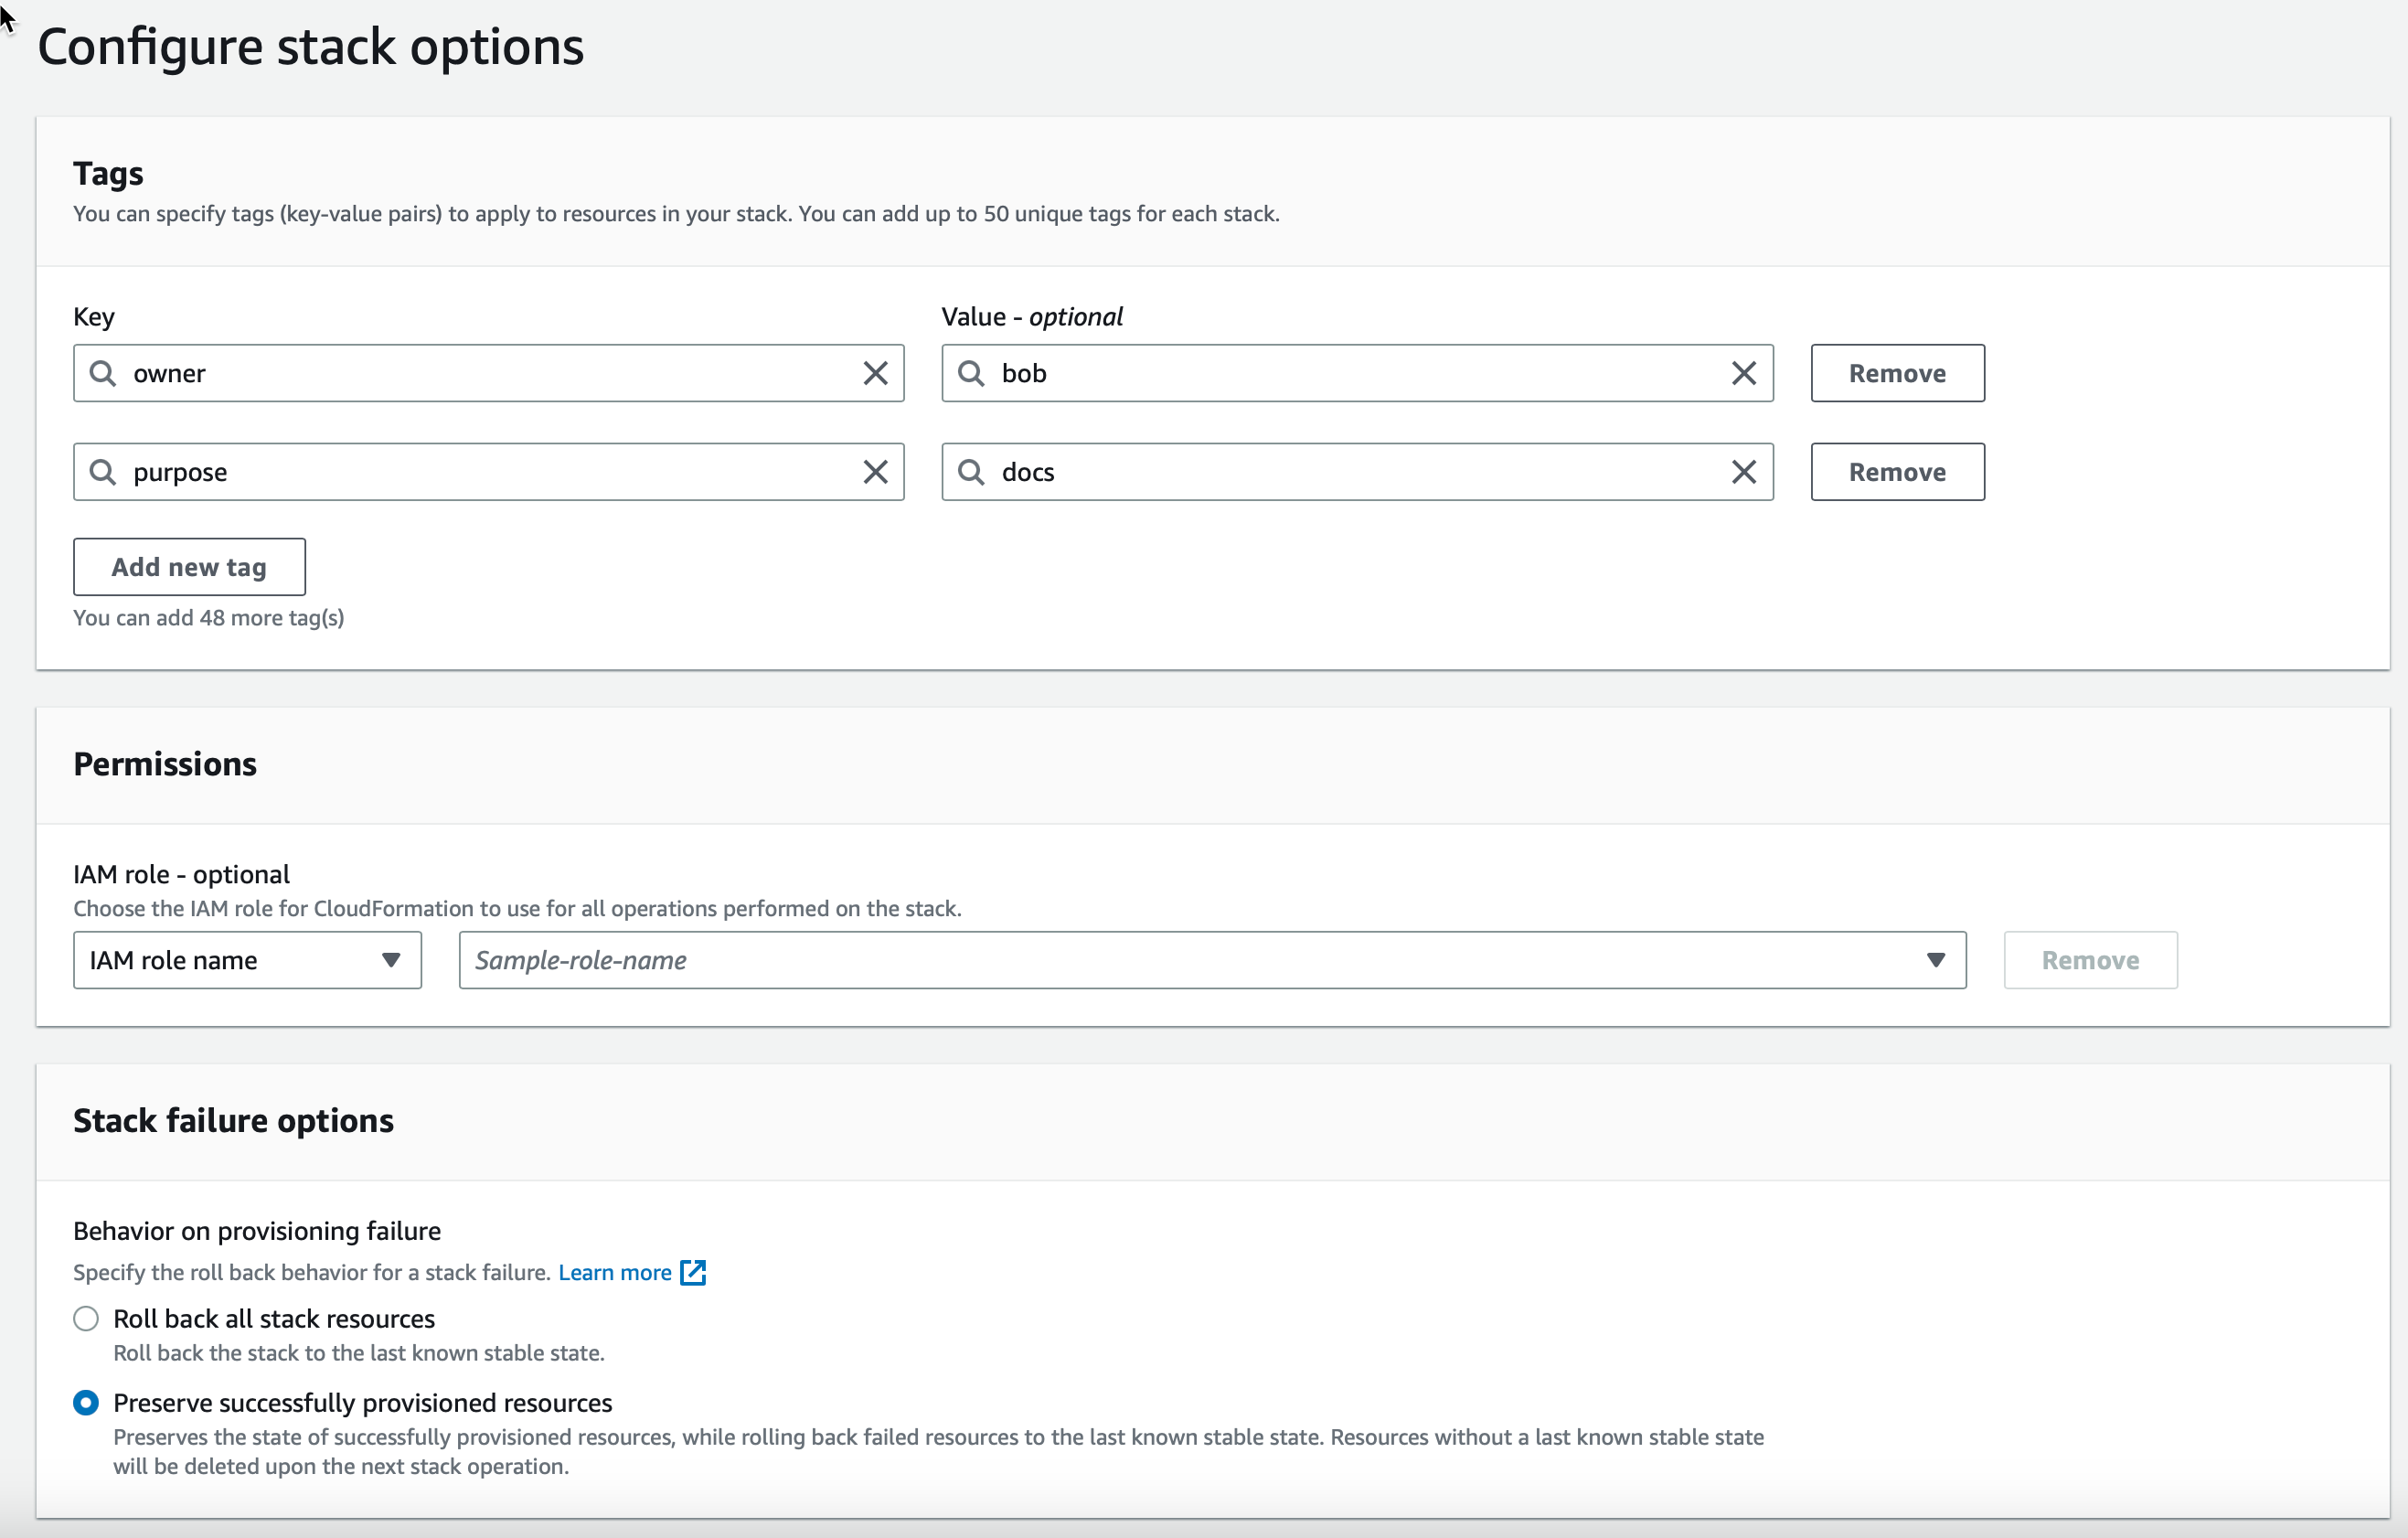
Tip: Adding AWS tags is recommended for tracking and billing purposes. Because AWS resources under a given account are created in a pool, you can use tags as a means of identifying which resources belong to a given organization or activity. For example, you can tag resources that belong to production, development, and test systems.
Review stack details
Review the stack settings and click Next again.

Acknowledge and create stack
Select the two acknowledgement check boxes to confirm your acceptance that some AWS resources will be created with certain permissions. Then click Submit.
Monitor progress
Monitor the progress of stack creation in the Events tab. Wait for the stack (and sub-stacks) to reach completion. This process takes at least 30 minutes. You can leave the browser unattended.
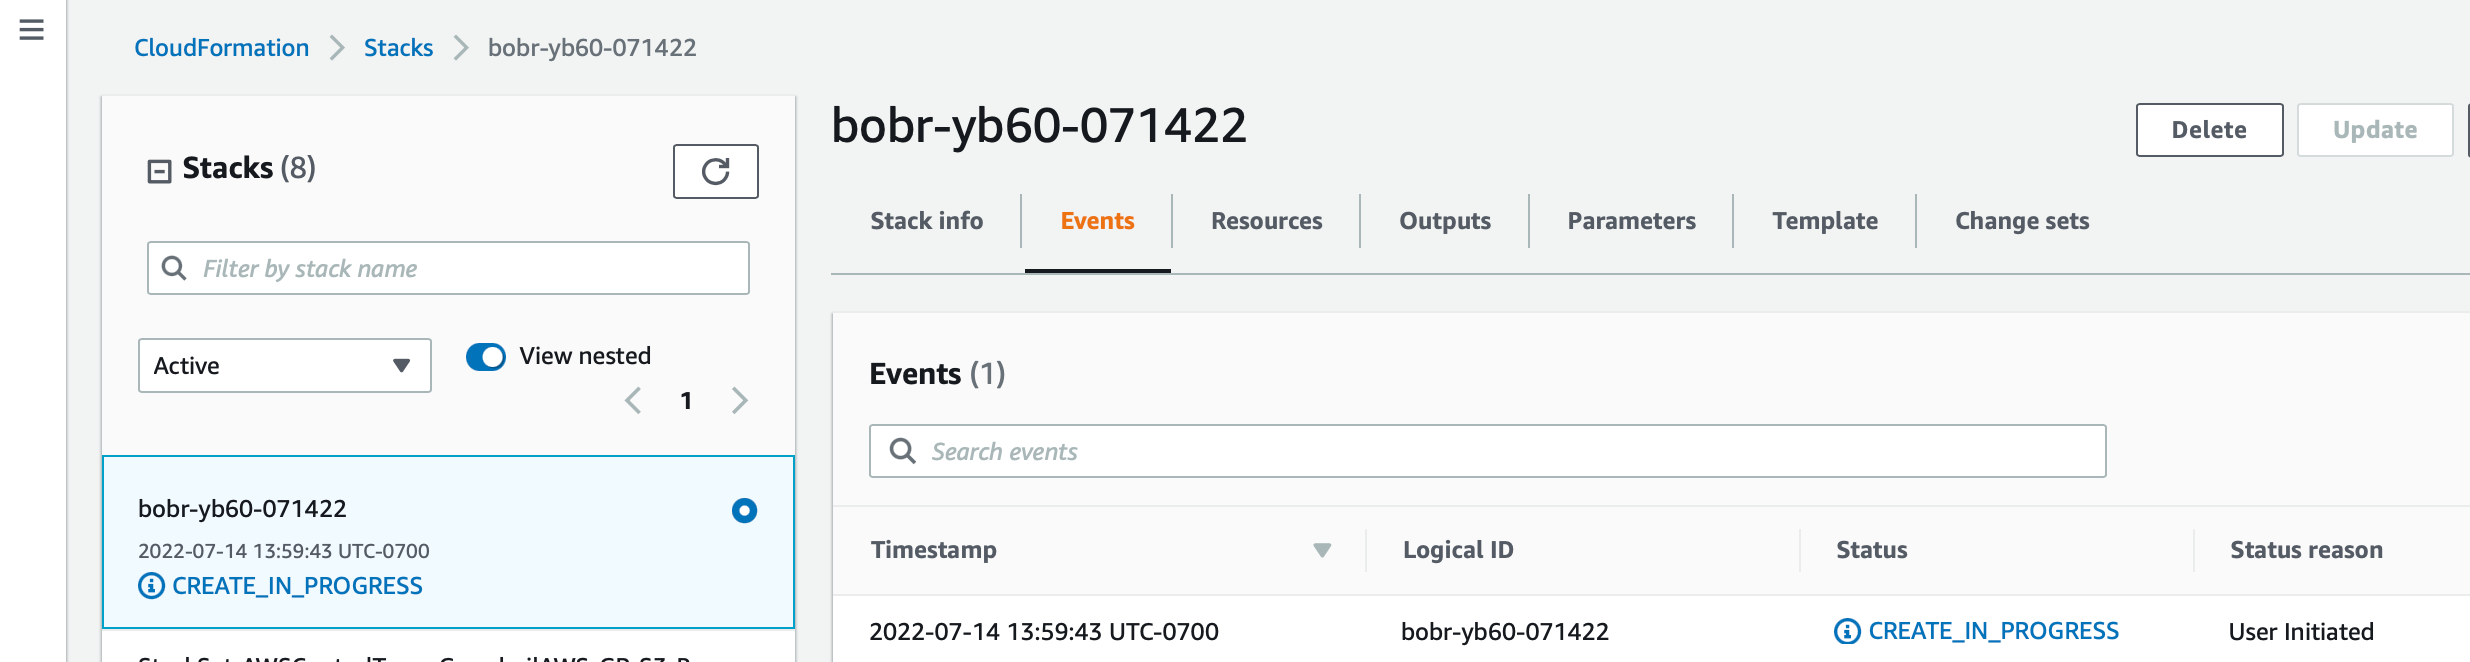
If a stack fails to complete, review the errors in the Events tab.
Important:
You may need to start the installation again and create a new stack. Before doing this, review the steps under Deleting Stacks and Resources.
Check the output
When the stack and all of its sub-stacks have been created successfully (that is, when they all have a status of CREATE_COMPLETE), go to the Outputs tab for the root stack.
You will see the URL and a username/password combination for your initial Yellowbrick Manager login. For example:
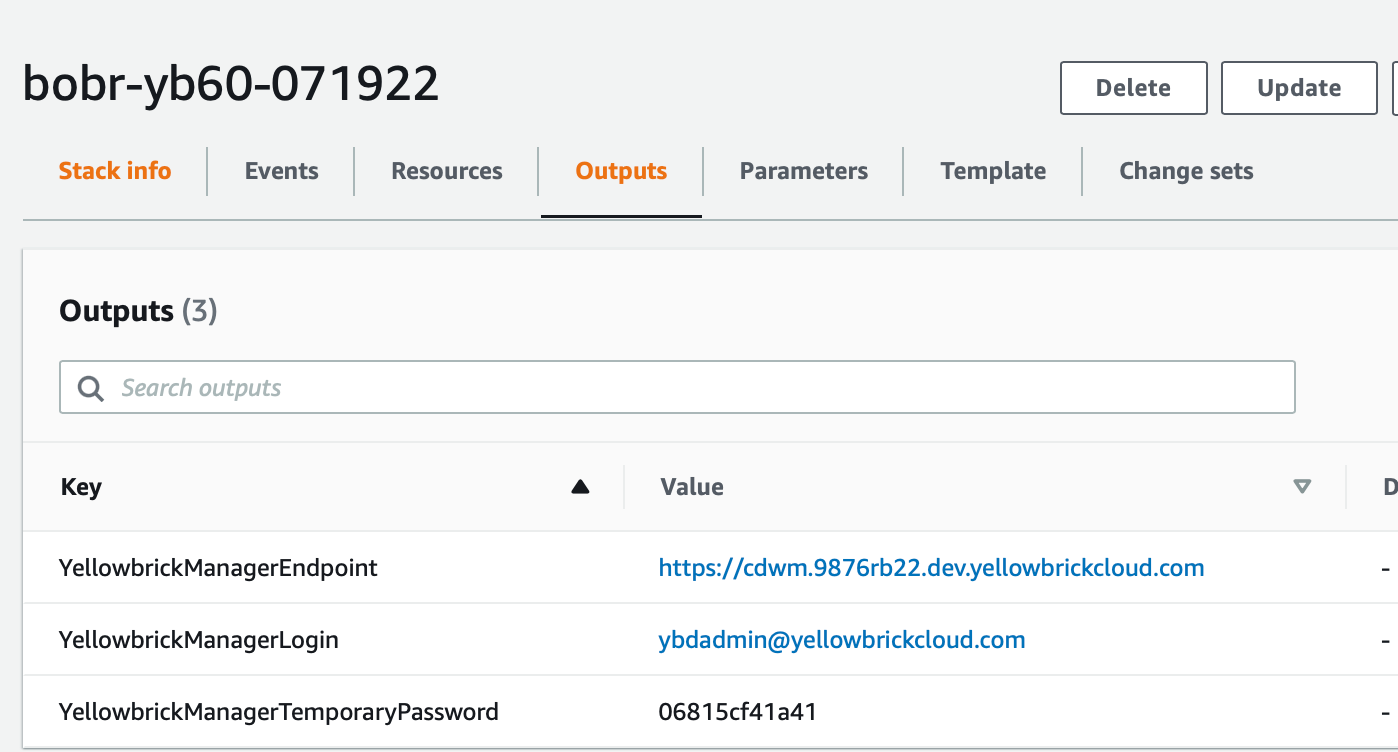
Copy these three pieces of information somewhere before leaving this screen.
Parent topic:AWS VPC Deployment Guide for Yellowbrick