Appearance
Replication Failover and Failback
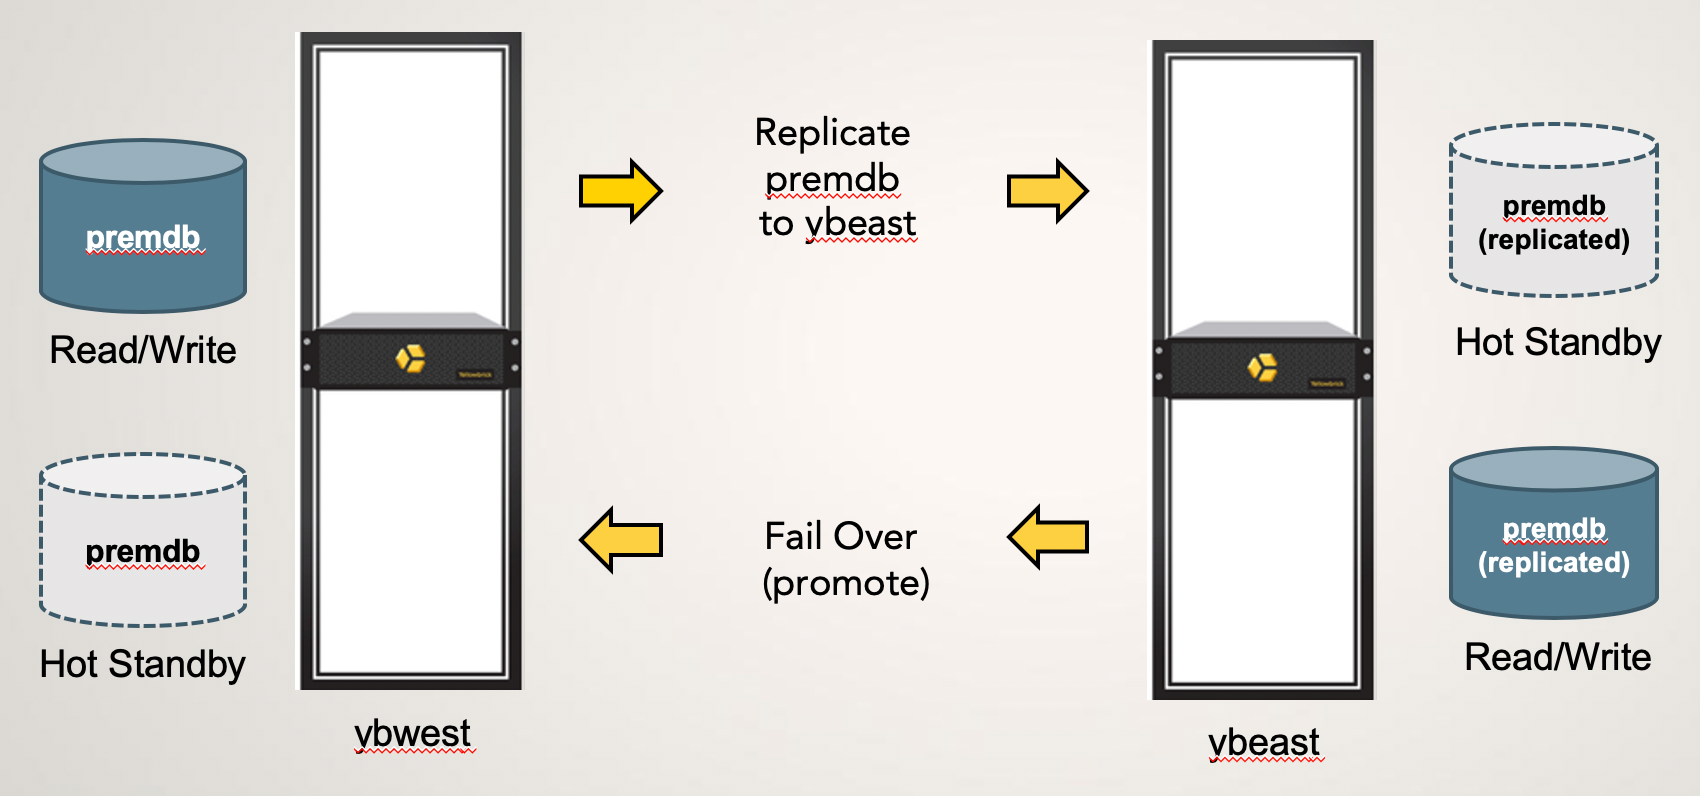
This section contains procedures for failing over and failing back (in the context of using database replication). The example in this section is based on the following configuration of appliances, databases, and replicas:
| Appliance | Remote Server | Source Database | Replica | Replica Database | Reverse Replica |
|---|---|---|---|---|---|
| ybwest (primary) | ybwest_svr | premdb | premdb_replica | premdb_replicated | N/A |
| ybeast (secondary) | ybeast_svr | premdb_replicated (after failover) | N/A | premdb (after failover) | reverse_premdb_replica |
Set Up Replication on the Primary System
Assume that replication has been started in the usual way, replicating data from the primary to the secondary appliance. The primary appliance is ybwest and the secondary is ybeast. The ybwest system has a database called premdb that replicates data to a database called premdb_replicated on ybeast.
The following commands were run on the primary appliance, ybwest:
yellowbrick=# create remote server ybwest with (host 'ybeast');
CREATE REMOTE SERVER

yellowbrick=# alter database premdb add replica premdb_replica to ybwest
with (alias premdb_replicated, frequency 60);
ADD REPLICA

yellowbrick=# alter database premdb alter replica premdb_replica start;
START REPLICA
Replication is running, and incremental changes to the source premdb database are being streamed to the replica database, premdb_replicated, on the secondary appliance, ybeast.
Prepare for a Possible Failover Event on the Secondary System
To be ready in the event of a problem with the primary system, you need to create a reverse replica on the secondary system. When the time comes to fail over, you will use this replica to reverse the direction of replication. Follow these steps:
- Make sure SSL trust is fully configured in both directions between the two systems. See Configuring SSL Trust.
- Create a remote server on the secondary system. For example:
yellowbrick=# create remote server ybeast with(host 'ybwest');
CREATE REMOTE SERVER- Log into a database on
ybeastand create a reverse replica. For example:
yellowbrick=# alter database premdb_replicated
add replica reverse_premdb_replica to ybeast
with(alias premdb, reverse_replica premdb_replica, frequency 60);
ADD REPLICA
Note that this command refers to the following objects:
Database being altered:
premdb_replicated, which is the replica database that was created when replication was first set up (the target forpremdb).New replica being added:
reverse_premdb_replica(a new and unique replica name)Remote server created on the secondary system:
ybeastDatabase
ALIAS:premdb, which is the name of the original source databaseREVERSE_REPLICA:premdb_replica, which is the name of the original replica forpremdbNote: Allow some time for forward replication to start before trying to create a reverse replica. The best approach is to wait for one replication cycle to complete.
Fail Over: Promote the Secondary System
Assume that the ybwest appliance cannot function as the primary system for some reason, and that replication from ybwest to ybeast needs to be paused or has stopped running. You can now reverse the roles of the two systems and fail over to the secondary system, ybeast.
To fail over, run the following PROMOTE command, using the reverse replica you created in preparation for this failover event:
yellowbrick=# alter database premdb_replicated alter replica reverse_premdb_replica promote;
PROMOTE REPLICA
This command takes the premdb_replicated database out of HOT_STANDBY mode and allows you to start using this database for read and write operations. When the ybwest appliance comes back online, replication will proceed in the reverse direction so that the premdb database receives changes from premdb_replicated and can "catch up."
The PROMOTE command starts replication in the reverse direction; you do not have to run a START command.
Fail Over with or without Data Loss
The PROMOTE command operates in two modes:
ALTER DATABASE name ALTER REPLICA name PROMOTE
or
ALTER DATABASE name ALTER REPLICA name PROMOTE WITH DATA LOSS
If you use the PROMOTE option, the command tries to force replication from the primary to the secondary and rolls back the source database to a known good rollback point for both databases.
If you use the PROMOTE WITH DATA LOSS option, the command does not try to force replication from the primary to the secondary. Whatever differences in data existed between the two databases at the time of running the command will exist when replication is reversed. Data written to the primary may be lost because it was not replicated.
If the database on the primary system cannot be reached when the PROMOTE command is run, the system returns an error. In this case, run the command again, using the WITH DATA LOSS option.
When You Are Ready, Fail Back
When you are ready, you can revert to the original replication setup, from ybWest to ybEast. All you need to do is run a PROMOTE command that fails back to the primary system.
On the primary system, ybWest, run the following command from a database other than premdb:
yellowbrick=# alter database premdb alter replica premdb_replica promote;
PROMOTE REPLICA
READONLY Mode for Source Databases On Restart
A source database for replication typically accepts all read and write transactions. However, if the system goes down or has to be restarted, source databases are temporarily placed in READONLY mode. After the restart, there will be a short delay before the source database accepts all transactions and replication cycles can resume. The same behavior occurs after an upgrade.
This behavior protects the two systems in the replication topology while a number of validation checks are performed. The system verifies that the database has a replica in RUNNING state and that the target system can receive replication traffic. When these conditions are met, the source database is taken out of READONLY mode and replication can resume.
You can query the sys.database view or use the ybsql \l command to check the current state of your databases. The sys.database view has a readonly_reason column that indicates why the database was placed in READONLY mode.
Parent topic:Managing Replication